Curriculum 'User Guide Viedoc 4'
Import data from ODM file Download PDF
1 About ODM import to Viedoc
- Viedoc supports data import using the CDISC ODM XML standard format.
ODM-XML is a vendor-neutral, platform-independent format for exchanging and archiving clinical study data. ODM-XML includes all information (clinical data, along with its associated metadata, administrative data, reference data, and audit information) necessary to share among different software systems during study setup, operation, analysis, submission and for long-term retention as part of an archive to facilitate the regulatory-compliant acquisition, archive and exchange of metadata and data. - In Viedoc Admin, you can import data from another EDC system (including Viedoc 3) to Viedoc by uploading a CDISC ODM xml file.
- Viedoc supports data import:
- As per standard CDISC ODM format.
- From ODM file with Viedoc specific data using extensions.
- The following sections describe how the mapping is performed during an import from an ODM file into Viedoc.
2 Study sites import

- The system will perform an automatic mapping based on site
Name(not case sensitive). If theCodeextension is present (for example if the ODM file originates from Viedoc), this is mapped as well. If this is empty, only theNameis used. - If
TimeZoneis present, this will be used. If it is not present, the UTC time zone will be used. - If
StudySiteSeqNois present, it will be used. If not present, it will be assigned a value = the maximumStudySiteSeqNo+ 1. - If
AddressandCountryare present they will be used, otherwise the default will be “SE” (Sweden).
3 Users import
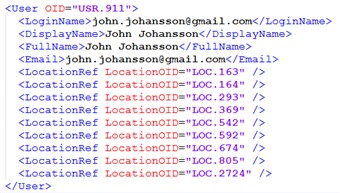
- The users are imported by full name and email address. Note! The users are not active right after the import is performed. They are just being imported to the system. You will have to send invitations to these users using these email addresses in order for them to get login access to Viedoc.
LocationRef- allows specifying which sites an user is linked to.RolesRef- Viedoc extension that allows specifying which roles the respective user has for a specific site, as well as the date when the role was assigned/deleted, if applicable.
4 Subjects import

- When adding a subject into Viedoc there are two behind-the-scenes system-items allocated:
StudySubjectSeqNois the sequence number of subjects on a study level. If that same subject above is the thirty-third subject in the study this item is 33.SiteSubjectSeqNois a sequence number of subjects on site. So if the subject is the third subject on the site, this item is 3.
- These two items can be used for various things, of which the subject ID is the most obvious and most impacting. So, when importing subjects from a previous study (either from Viedoc or an external system), it is important that these are set properly, especially if they have been used as part of the subject ID and you want to keep the same subject ID.
- If those extensions are present, their content is imported.
Note! If the sequence numbers exist in the ODM file, but they are also mapped during the import process (at Step3/5), then the mapping takes precendence. - If those extensions are not present in the imported file, it is possible to specify them during the import process (Step 3/5).
- When importing to an existing study with existing data, matching of existing subjects is performed as follows:
- If the sequence numbers are provided, these are used to perform the matching. Note! If the sequence numbers exist in the ODM file, but they are also mapped during the import process (at Step3/5), then the mapping takes precendence.
- If the sequence numbers are provided, but no match is found then the
SubjectKeyis used.
- If the sequence numbers are not present, then one of these needs to be mapped during the import process (Step 3/5).
5 Workflow - Import a new study from ODM

- Before you start importing the ODM file, you have to make sure that you already have a study in Viedoc that has a study design that matches the data structure in the ODM file to be imported. The metadata version(s) in the ODM file to be imported must contain alll the events, forms, itemgroups, items and code list values that are referenced by ClinicalData. The import process performs the matching only by usig OIDs.
In case you don't have such a study, this can be done as described below:- Create the study in Viedoc Admin and make sure that you invite a user to the study that would have access to Viedoc Designer to perform the design import mentioned below (for instructions see Add new study). (A)
- In Viedoc Designer, import the design from the ODM file to the study you have just created previously in Viedoc Admin (for instructions see Initiating a design) (B)
- Note! This step must be performed only if the ODM file to be imported does not originate from Viedoc.
In Viedoc Designer, for the newly imported study design, go to Study Settings and configure the Subject ID Generation Settings (for instructions see Study settings). This will impact the selection you would have to make later on in Import ODM File - Step 3/5 of the ODM import described in the later sections. (C)
6 Initiate the import
- Select your study where the data will be imported
- Go to Study Settings
- Select the Import ODM File tab
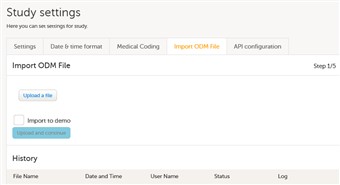
7 Import ODM File - Step 1/5
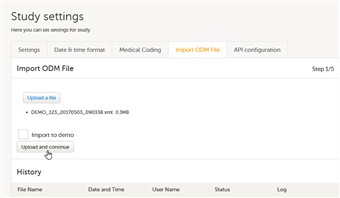
- Click the Upload a file button and browse for your ODM file to be imported.
- The file name and size will appear right under the Upload a file button. You might get some error messages in red saying that the file cannot be uploaded due to some missing content (according to the CDISC ODM standard). In this case you have to go back to your ODM file, fix the error and upload the file again.
- Click Upload and continue. This will get you to the next step 2/5 of the import process.
8 Import ODM File - Step 2/5
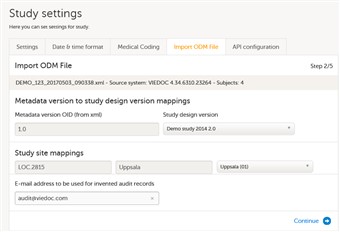
- Choose from the Study design version dropdown list, the version of your study design in Viedoc the data will be imported to. The design has to match exactly your ODM data to be imported.
- In Study site mappings, the two columns on the left represent all the sites found in the ODM file you have uploaded. On the right side column are the sites currently available in the study you have selected to import to.
The system will perform an automatic mapping based on site name (not case sensitive). If the code extension is present (if the ODM file originates from Viedoc), this is mapped as well. If this is empty, only the name is mapped.
If no match is found it will default map to “Create new site”. You can also manually perform the mapping by selecting in the drop-down list. If a match is found but you anyway choose Create new site, a duplicate site will be created, which is not a recommended approach.
Note! Make sure that every Location in the ODM file to be imported has at least one MetaDataVersionRef defined, otherwise no designed will be assigned to the respective site. - Enter an email address to be used to when the import needs to create audit-records, in the Email address to be used for invented audit records.
- Click Continue. This will get you to the next step 3/5 of the import process.
9 Import ODM File - Step 3/5
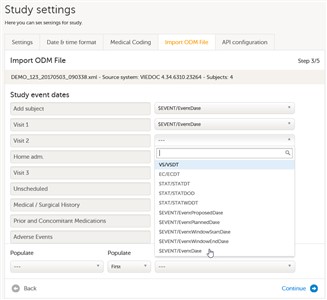
- Under Study event dates choose what dates you want to be matched to you events. If no selection is made and a form and item combination within the event called “$EVENT.EventDate” is found (the Viedoc way to store event dates), this will be used. If the ODM file originates from Viedoc, you will find this form/item combination in the drop-down-list.
- From the Populate dropdown lists, you can set how the subjects will be ordered in Viedoc, according to the order they have in the ODM file to be imported. It is important to do this correctly, because the settings here determine how the subjects will be ordered and matched in both cases when no data exist in Viedoc and when the study already has data in Viedoc and you import some more (in this case it is important that the subjects are matched correctly so that no duplicates are created).
When a subject is added in Viedoc, there are two system items created for it:- SiteSubjectSeqNo
- StudySubjectSeqNo
The settings to be performed here depend on if the ODM file to be imported has the SiteSubjectSeqNo and/or StudySubjectSeqNo extensions (ODM file originates from Viedoc) or not.- If the ODM file has the has the SiteSubjectSeqNo and/or StudySubjectSeqNo extensions (ODM file originates from Viedoc), then no settings are required at this step, as they will be imported. You can continue to Step 4/5.
- In case the ODM file does not have the has the SiteSubjectSeqNo and/or StudySubjectSeqNo extensions, this step depends on the settings made in Viedoc Designer regarding the Subject ID Generation Settings (described in the first section 1. ODM import overview ).
- If you have used one of the SiteSubjectSeqNo or StudySubjectSeqNo, then you have to choose this one from the first Populate dropdown list, and then choose from which form in your study this variable will be picked from in the (form/item) dropdown list. In the second Populate dropdown list you can choose if the first or last occurrence in the data set should be used, if the variable you point out occurs multiple times for a single subject (default is First).
- If you have used a different one than the SiteSubjectSeqNo and StudySubjectSeqNo, then you should not make any selection in the Populate fields.
- Note! Once you have selected an option from the dropdown list, it is not possible to go back to no selection. It is only possible to select another option from the list.
- Click Continue. This will get you to the next step 4/5 of the import process.
10 Import ODM File - Step 4/5
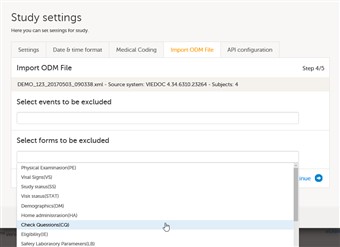
- Select events to be excluded by clicking on the field and choosing the events from your ODM file that you don't want to be included in the imported study. You can select one event at a time and repeat the operation for all the events that you don't want to include in the import.
- Select forms to be excluded by clicking on the field and choosing the forms from your ODM file that you don't want to be included in the imported study. You can select one form at a time and repeat the operation for all the forms that you don't want to include in the import.
Note! When importing an ODM file that was exported from Viedoc 4, you must exclude the $EVENT form. - Click Continue. This will get you to the last step 5/5 of the import process.
11 Import ODM File - Step 5/5
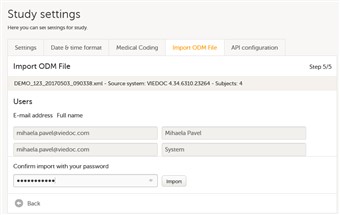
- A list of the users (from the imported ODM file) identified by email address and full name is displayed.
- Confirm the list of the users to be added to your study by entering your password and clicking Import.
- Note! The users are not active at this moment. You have to send invitations to these users using these email addresses in order for them to get login access to Viedoc (for instructions see User Management).
12 After the import
- Once you have imported the file and invited the users, your study is now in Viedoc, accessible for the users you have invited according to the respective roles.
- The PDFs with the forms history are not available right after the import, but once you have performed and export to PDF (for instructions see Data export), those will be generated and available in Viedoc.