Curriculum 'User Guide Viedoc 4'
User management Download PDF
1 Important!
- The Study Manager should, in cooperation with the site manager(s), ensure that all users of Viedoc are informed, and certify, that all electronic signatures created in the system are intended to be the legally binding equivalent of a traditional handwritten signature.
- In Viedoc the purpose/meaning of a signature is always “responsibility” as used in Sec. 11.50 of FDA 21 CFR part 11. The signer is thereby acknowledging his/her responsibility for the entered data. Viedoc keeps account of what was signed, who signed it and when the signature was performed.
2 Types of roles
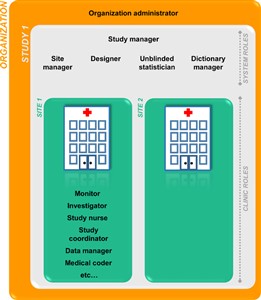
- Viedoc supports two different types of roles. System roles: • Organization administrator • Study manager • Designer • Site manager • Unblinded statistician • Dictionary manager. The system roles are defined by the system and give access to Viedoc Admin. See also System roles in the Introduction section in the eLearning for more information. Clinic roles, such as: • Investigator, • Study nurse, • Study coordinator, • Data manager, • Medical coder. The clinic roles are study-specific and give access to Viedoc Clinic. These roles, and the rights that belong to these roles, can be defined in Viedoc Designer. Each study can have an unlimited number of clinic roles.
- The study manager can assign users to system roles and clinic roles. The study manager can also delegate the assignment of users to clinic roles to the site manager.
- To select the roles to which the site manager can assign users, follow the steps below.
These settings apply to all sites and all site managers involved in the study. When the assignment of (some of the) clinic roles is delegated to the site manager, these clinic roles can no longer be managed by the study manager.1. In Viedoc Admin, click Study settings.The study settings window opens. 2. On the Settings tab, in the field Clinic roles to be administered by Site Manager, select which roles should be assigned by the site manager. The roles that can be selected here are the clinic roles that are defined in the study design. 3. Click Save changes, and click Close.
3 List of users
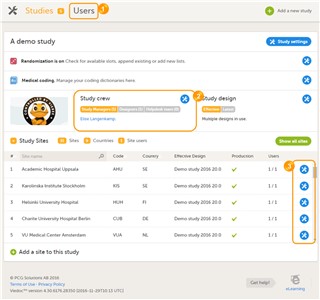
- A list of users can be viewed at the following three places (see image): 1. On the Users tab in the top bar. This tab displays a list of all users within all studies and sites in the organization. 2. In the Study crew window. This window displays a list of all users within all sites of the current study. 3. On the Site users tab of the site settings window. This tab displays a list of all users within that specific site of the study.
- The status of users is displayed in the status column:
Status Indicated by Inactive (account not created) red question mark Active, logged in green check mark Active, not logged in grey check mark Active, locked out lock icon - Tip! Searching for a user is easiest via the Users tab in the top bar. In this tab, you can search for a specific user among all users within the organization by entering the user’s name or e-mail address in the search field.
- In the Users tab in the top bar, you can sort the list of users by name, status or date of creation. You can group the list of users by study by selecting Studies in the Group by field. .
4 User details
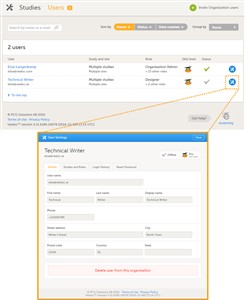
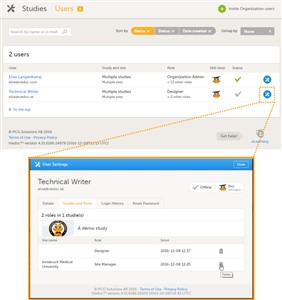
- To view the details of a specific user, click Users in the top bar and click the toolbox icon behind the name of that user. The User Settings window will open.
- The User Settings window displays whether the user is online, and the experience that the user has. The User Settings window has the following tabs: • Details, read-only information about the user’s name and contact details. • Studies and Roles, a list of sites and roles the user has access to. • Login History, a list of all logins by that user, including date and time, the IP address, and the browser that was used for logging in. • Reset Password, used to reset the password for a user (see chapter 9).
5 Assign an organization administrator
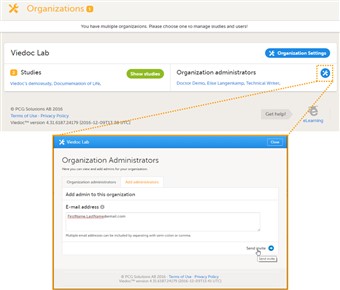
- By default, every organization has at least one organization administrator. Additional organization administrators can only be added by the organization administrator.
- To add an organization administrator, follow the steps below:
1. In the Organizations window in Viedoc Admin, click the toolbox icon in the Organization administrators field. The Organization Administrators pop-up opens. 2. In the Add administrators tab, enter the e-mail address of the user you would like to invite to the role organization administrator. Tip! You can invite multiple users at once by adding multiple e-mail addresses in the field. Separate the e-mail addresses with a semi-colon or comma. 3. Click Send invite. An invitation e-mail will be sent to the e-mail address you specified.
6 Assign users to system roles and/or clinic roles – Study manager
- Only the study manager can invite users to system roles. The study manger can invite users to clinic roles if the management of these roles has not been delegated to the site manager.
- If a user should receive access to multiple sites, the quickest way to invite the user is through the study crew window (described in this chapter). If a user should receive access to only one site, you can also invite the user through the site settings window of that site (see the next chapter).
- You can give users access to individual sites, or to groups of sites (system site groups). The following system site groups are automatically created by the system, when sites are added to the study: • All sites, containing all sites in the study. • All production sites, containing all production sites in the study, including the sites that are in both production and training mode. • Country-specific, for example ‘Sweden’, containing all production sites (including the sites that are in both production and training mode) in that specific country in the study.
- When you invite users to a system site group, the users will automatically receive instant access to all sites in that group, including all future sites that will be added to that group at a later time. Similarly, these users will automatically lose access to a site, once that site has been removed from the group. For more information about system site groups, see the section Managing study sites in the eLearning.
- To invite users, follow the steps below:
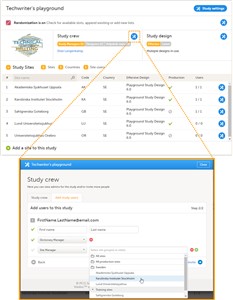
1. In Viedoc Admin, open the study to which you would like to invite users. 2. Click the toolbox icon in the Study crew field. The Study crew pop-up opens. 3. In the Add study users tab, enter the e-mail address of the user you would like to invite. Click Continue. Tip! You can invite multiple users at once by adding multiple e-mail addresses in the field. Separate the e-mail addresses with a semi-colon or comma. 4. • If the user does not yet exist, enter the first name and the last name. • If the user already exists in the organization, the first name and last name of the user and the roles that this user already has access to are displayed. 5. Select the role to which you would like to invite the user. You can add multiple roles by clicking the + icon. Newly added roles can be removed by clicking the - icon. 6. If you selected the role ‘site manager’, or a clinic role, select the system site group or the individual sites to which the user should get access in this role. To select a system site group, click on the name of the group. To select an individual site, click on the name of the site. Note that sites that do not belong to a system site group (for example training sites) are listed under a separate header (e.g. ‘Training sites) at the bottom of the list of site groups and sites. This header lacks the folder icon, and does not represent a system site group (see image). 7. Click Send invite. An invitation e-mail will be sent to the e-mail address(es) you specified.
7 Assign users to clinic roles – Site manager
- The site manager can invite users to (some of the) clinic roles, if the study manager has delegated the management of these clinic roles to the site manager.
- To invite users to a specific site, follow the steps below:
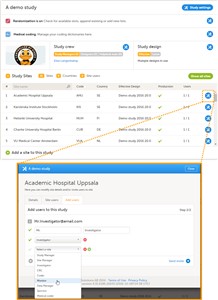
1. In Viedoc Admin, click the toolbox icon behind the site to which you would like to invite users. The site settings pop-up opens. 2. In the Add study users tab, enter the e-mail address of the user you would like to invite. Click Continue. Tip! You can invite multiple users at once by adding multiple e-mail addresses in the field. Separate the e-mail addresses with a semi-colon or comma. 3. • If the user does not yet exist, enter the first name and the last name. • If the user already exists in the organization, the first name and last name of the user and the roles that this user already has access to are displayed. 4. Select the role to which you would like to invite the user. You can add multiple roles by clicking the + icon. Newly added roles can be removed by clicking the - icon. 5. Click Send invite. An invitation e-mail will be sent to the e-mail address or e-mail addresses you specified.
8 Remove a user
- If a user is invited to an incorrect role, the access can be removed. Removing a user’s access to all or some roles can only be done by the study manager. If the study manager has delegated the management of certain clinic roles to the site managers, only the site managers can remove access from users to these roles and sites.
- To remove the access from users, follow the steps below:
1. On the Users tab in the top bar, scroll to the user whose access you would like to remove. Click the toolbox icon behind the name of the user. The User Settings pop-up opens. 2. In the Studies and Roles tab, scroll to the study, site and role for which the access should be removed. Click the trash can icon. A pop up appears. 3. Click Delete to confirm that the access should be removed, or click Cancel to cancel. The user and role for which you removed the access, will be removed from the Studies and Roles list. - Any records generated by the user are stored in the audit trail even when the user has been removed.
9 Unlock a user account
- If a user has typed in the wrong password more than three times, and forgotten the answer to the challenge question – and therefore cannot use the Forgot your password link – the account will be locked. The study manager or site manager can unlock a locked account.
- To unlock a user account, follow the steps below:
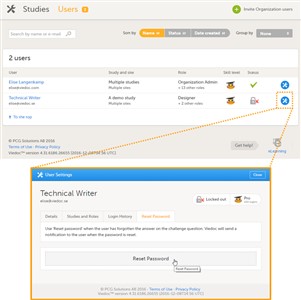
1. On the Users tab in the top bar, scroll to the user whose account you would like to unlock. Click the toolbox icon behind the name of the user. The User Settings pop-up opens. 2. In the Reset Password tab, click Reset Password. The user will receive an e-mail with a link to reset the password. - The link directs the user to a window where the user is asked to set a new answer to the old challenge question, and to create a new password. Once the password has been reset, the user can login and select a new challenge question in the security settings..
- Note! The email with the link to reset the password is only valid for twelve hours. If the user has not reset the password within twelve hours, a new e-mail needs to be sent.