Curriculum 'User Guide Viedoc 4'
Study settings Download PDF
1 Settings overview
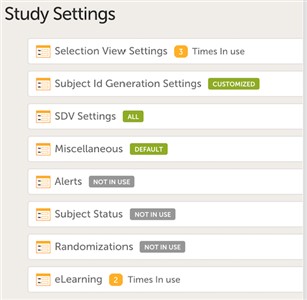
- There are various study settings that can be configured in a study. This chapter describes them one by one.
2 Selection view settings
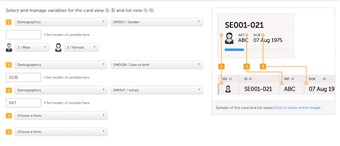
- The information to be displayed on the patient card is set on this page. There is room for 2 variables apart from the gender on the card. Choose the form and item to be displayed and set a header of the variable.
- Additional variables can be added but these will only be shown if the user chooses the "list view" option in Clinic to display the patients.
- Note!Items that are added to the patient card and list view are visible for all users, regardless of the role visibility conditions of the items.
3 Subject ID Generation Settings
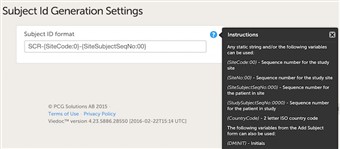
- The ID of the patient can be set in various ways. The system has a default suggestion of an ID that consists of the country code followed by the site ID and finally the consecutive patient ID. This can of course be changed by modifying the contents of the text field.
- Any item collected on the form that is selected for the start event in the workflow can also be used when setting up the ID. Click the blue "?" icon for more info.
4 SDV Settings
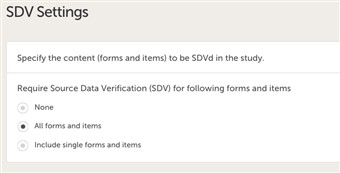
- The SDV setting enables you to choose what forms and items to be SDVd in your study. The options are:
• none
• all forms and items (default)
• selected forms and items.
5 Miscellaneous
- This section is the home of settings that don't fit anywhere else.
- Currently you can choose to disable the need for a reason for when a field is left blank.
6 Alerts

- By adding an alert in your study you can highlight important occurrences in the data to one or several user roles.
- The alert consists of an internal description, a condition and a message part where you decide who should receive the message and what the subject and content of the message should be.
- Alerts are by default always sent as an internal message within Viedoc and can be seen on the start page under the icon "messages". As an option you can choose to also send the alert as an email.
- You can use any variable from the CRF or a "system context" variable to include in the subject or message section, see screen shot to the right.
- A separate e-mail will be sent to each of the users assigned to the roles that are specified in the To: field.Users assigned to roles specified in the CC: field will receive a separate copy of each e-mail, i.e. if there are 5 users in the system with the roles specified in the To: field, and 1 user with the role specified in the CC: field, then 5 separate e-mails will be sent out, and the user with the role in CC: will get the same e-mail 5 times.
7 Subject Status
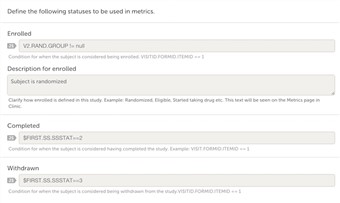
- To be able to get the most out of the Metrics section in Clinic, you need to define the statuses of a subject.
Add applicable JavaScript that corresponds to the statuses; enrolled, completed, withdrawn.
8 Randomizations
- The randomization service in Viedoc 4 creates a randomization list and an optional allocation list. The randomization list allocates a treatment to the subject upon randomization. The allocation list allocates a kit number to the subject, based on the allocated treatment. The optional allocation list is most commonly used in double-blind studies.
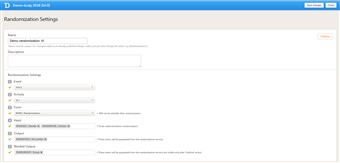
- To configure the design of the randomization, follow the steps below:
1. Click Randomizations. 2. Click the randomization design that you would like to configure, or create a new randomization design. 3. Specify a name for the randomization design. 4. Optional: enter a description. 5. Select the event during which the patient will be randomized. 6. Select the activity during which the patient will be randomized. 7. Select the form that will be used for randomization. 8. Select the input.The input factors are the prognostic factors that might influence the effect of treatment on the subjects. The prognostic factors should be specified in the form that is used for the randomization. It is also possible to include country and site as input factors. 9. Select the output.The output is the items or groups to which the subjects will be assigned by randomization. The output will be visible for anyone participating in the study. 10. If you are running a study where the randomization outcome should be blinded, select the blinded output. These are the items or groups to which the subjects will be assigned by randomization, but that will not be visible for any user or subject, except for the Unblinded Statistician. 11. Click Save changes, and click Close. - For details about dynamic randomization and how this is implemented in Viedoc, see Dynamic randomization.
9 eLearning
- Here you set what eLEarnings that should be available in your study. By default, two eLearning programs are already prepared so you don't have to do any configuration on this page.