Curriculum 'User Guide Viedoc 4'
Study workflow Download PDF
1 Overview

- The study workflow is the place where you add visits (events) to the study. The events are then populated with activities and forms.
- The study workflow consists of 4 parts;
• Study start - Here you add the form that should be the first form the user sees when clicking "Add card/patient". Normally, this part should only contain one event with one activity that includes only one form.
• Scheduled Events - Under this section you should add all the expected visits (events) in the study.
• Unscheduled Events - If there is a need to add additional unscheduled visits to the study, these are created here. Whenever something is added under this section the link "Add visit" will appear as a link in Viedoc Clinic.
• Common events - Events added under this section are not linked to a study visit. Normally the events and forms that are added here are adverse events, concomitant medications, medical history etc.
2 Event vs Activity vs Form

- An event can contain one or several activities. An activity can contain one or several forms. Both events and activities can have visibility conditions making them visible only if the condition is true.
- The white box is the event. The green box within the event is the activity. The yellow boxes within the activity are the forms.
- Please observe! It is possible to collect the same form multiple times during the same event as long as it placed in different activities. A normal scenario is when you for example collect vital signs pre-dose and post-dose. The vital signs form can then be designed to only contain one time-point and the user will enter the first time-point first and the second one in a separate activity. This way forms that are repeated during a visit become much cleaner for both the designer and the site staff.
3 Event - General settings
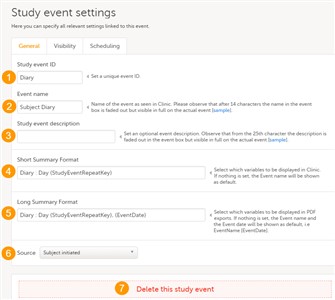
- Click on the pen icon in the upper right corner of the respective event in order to open the Study event settings. Under the General tab, you can configure the following:
- Study event ID (1) - an unique ID used to identify the event. This field is mandatory and it can not contain spaces or special characters.
- Event name (2) - the name of the event. This field is mandatory. Please observe that after 14 characters the name in the event box is faded out but fully visible on the actual event page.
- Study event description (3) - an optional description of the event. Please observe that from the 25th character the description is faded out in the event box but fully visible on the actual event page.
- Short Summary Format (4) - an event identifier used to define how the respective event will be displayed in Viedoc Clinic:
• in the events list in the subject selection page in Viedoc Clinic.
• in the event details view in Viedoc Clinic.
• in the event date form.
• in the review console and signing console.
The short summary format replaces the long summary format before the event is initiated (see the description of long summary format below).
This is a text field where you can use variables (see the complete list at Using JavaScript in Viedoc) as well as free text. For the recurring events, theStudyEventRepeatKeycan be used to distinguish between occurrences of the same event.
If nothing is set here, the default value that will be used is the event name.
An example is described in Scheduling events. - Long Summary Format (5) - an event identifier used to define how the respective event will be displayed after it is initiated, in the following places:
• in the form header in Viedoc Clinic.
• in the header of the form pdf.
• in the pdf export for Viedoc versions 4.39 and higher.
Before the event is initiated in Viedoc Clinic, the short summary format is used to identify the event in all the above mentioned.
This is a text field where you can use variables (see the complete list at Using JavaScript in Viedoc) as well as free text. For the recurring events, theStudyEventRepeatKeycan be used to distinguish between occurrences of the same event.
If nothing is set here, the default value that will be used is event name [event date].
An example is described in Scheduling events. - Source (6) - select if the respective event is a Viedoc Clinic or a ViedocMe event. See Subject initiated events section later in this lesson.
- Delete this study event (7) - click to delete the respective event.
4 Event - Visibility settings
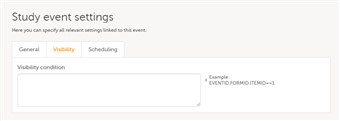
- Click on the pen icon in the upper right corner of the respective event in order to open the Study event settings. Under the Visibility tab, you can add a condition for the respective event to be visible only when the condition is evaluated to true. The condition is written as an expression in JavaScript.
- If the field is left empty, then the event will always be visible in Viedoc Clinic.
- Note! Visibility condition can be set only for the scheduled events. It is not possible to set a visibility condition for the study start event, unscheduled events and common events.
5 Event - Scheduling
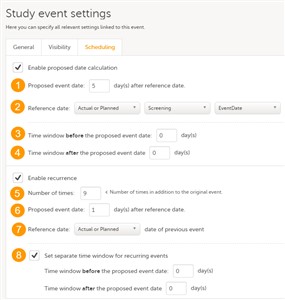
- Click on the pen icon in the upper right corner of the respective event in order to open the Study event settings. Under the Scheduling tab, you can set how the proposed date will be calculated and also set the recurrence settings for the respective event.
- Enable proposed date calculation (1) - if checked, then the proposed date will be calculated as n
days after the reference date. The Reference date (2) can be set to Actual or Planned or Proposed event date of the event selected from the dropdown list.
You can also set a time window before and after the proposed date, by entering the respective number of days under Time window before (3) / after (4) the proposed date. By default this is set to 0 days before/after the proposed date.
Note! The option to enable proposed date calculation is not available for the first event in the Scheduled events list, as there is no event before it to base the calculation of the proposed date on. - Enable recurrence - option that allows for the same event to reoccur on a scheduled basis, according to the settings described below. If the option is checked, the event will be recurring and you can set:
• Number of times (5) - how many times the event will reoccur (this does not include the first occurrence). If this number is set, for example, to 3 times, then the event will occur 4 times in total. The maximum number that can be set is 999. • Proposed event date n days after reference date (6) - the number of days between two consecutive occurrences. You can choose from the Reference date dropdown list (7) if the reference date is the Actual or Planned or the Proposed date of the previous occurrence of the event. • Set separate time window for recurring events (8) - optionally set a separate time window for each of the event occurrences by entering the number of days before and after the proposed date. If this is not set, then the time window set for the original event (at (3) and (4)) applies. - The scheduling of the events is available only for the Scheduled events.
6 Subject initiated events
- When collecting data from subjects using ViedocMe at least one of the events need to be checked as a "subject initiated event". Currently it is only possible to collect subject generated data on separate visits,i.e you cannot mix forms to be completed by the site and subjects on the same visit.
- When at least one event in the workflow is marked as "subject initiated" the mobile phone icon will appear in the Viedoc Clinic interface where the ViedocMe account can be initiated by the site staff.
- Note! The Study start event, as well as the first event under Scheduled events cannot be a subject initiated event.
- For the description of the event settings, see the sections above.
Note! The summary format is not displayed in ViedocMe, it is used only for Viedoc Clinic. - For the scheduled events that are subject initiated it is possible to schedule the activity, as follows:
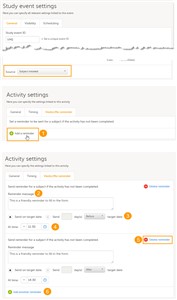
Click the pen icon to open the Activity settings window. Under the Timing you can configure the following:- Enable proposed time calculation for subject initiated activities - at a certain time as set in the At time field. The default time is 00:00. Click on the clock icon to edit the time. Click on the dropdown arrow and choose Reset to set the time to the default 00:00.
- Time window before/after the proposed time - enter the number of hours before/after the proposed time set above. The default is 1h before and 1h after the proposed time.
Note! Keep in mind that setting the time window to +/- 0 would mean that the subject must fill in the form on the exact proposed time.
- Setting ViedocMe reminders
It is possible to set ViedocMe reminders for activities within the scheduled events that are subject initiated, as follows:
Click the pen icon to open the Activity settings window. Under the ViedocMe reminder tab, click Add a reminder (1) to add the first reminder.
In the Reminder message field (2), write the message that will be displayed for the ViedocMe user.
Set the date the reminder will be sent out (3). You can choose one of the following:- Send on target date
- Send n day(s) before/after target date
To remove a reminder click Delete reminder (5).
You can add more reminders for the same activity by clicking Add another reminder (6).
Notes!- The reminders are sent if the activity was not completed, i.e. when there is at least one uncompleted form within the activity.
- For the reminders to be sent to the subjects via email/phone text message:
• In Viedoc Admin under Study Settings, the Allow reminders in ViedocMe to be sent as option must be checked.
• In Viedoc Clinic, the subject email address and/or phone number must be entered in ViedocMe account and the option(s) Send reminders to this e-mail address / Send reminders to this phone number must be checked. These fields are visible only if the above-mentioned setting was previously performed in Viedoc Admin. - The reminders are sent according to the latest effective design, i.e. even for the subjects added in older design versions if the above conditions are fulfilled.
- The current site timezone is used when sending reminders.
- Reminders are not sent retroactively, i.e. if a subject is added in the system after the time when the reminder should be sent, the reminder is not sent to that subject.
7 Summary Format for Common Events
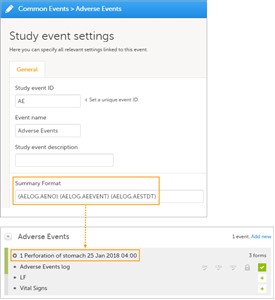
- The Summary format is an event identifier used to define how the respective event will be displayed in:
• form listing in the unscheduled event pop-up. • event shortcut in the form header. • form pdf header. • pdf export for Viedoc versions 4.39 and higher. - Click the pen icon on the event to update the summary format.
- This is a text field where you can use variables (see the complete list at Using JavaScript in Viedoc) as well as free text. An example is illustrated in the image.
8 Activity settings
- You can edit the activity settings by clicking on the pen icon in the upper right corner of the respective activity.
- General settings
Under the General tab, you can configure the following:- Activity ID - a unique ID used to identify the activity. This field is mandatory and it can not contain spaces or special characters.
- Activity name - the name of the activity. This field is optional.
- Activity description - an optional description of the activity.
- Visibility condition - set the respective activity to be visible only when the condition is evaluated to true. The condition is written as an expression in JavaScript.
If the field is left empty, then the activity will always be visible in Viedoc Clinic.
- Timing - available only for the scheduled events that are subject initiated. See section Subject initiated events above.
- ViedocMe reminder - available only for the scheduled events that are subject initiated. See section Subject initiated events above.
9 Form settings
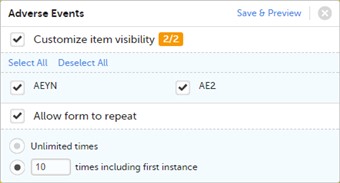
- It is possible to edit the form settings within a certain activity, by clicking the pen icon in the upper right corner of the respective form within the respective activity. An orange pen icon means that at least one of the two options: Customize item visibility or Allow form to repeat (described below) is selected.
- You can select which items of the form should be visible at activity level, by checking the Customize item visibility option. The list of the items in the form will be displayed and you can select which items should be visible in that form within the respective activity. The unchecked items will be hidden.
By default, all the items are visible, i.e. the Customize item visibility box is unchecked. - You can mark the form as repeating, by checking the Allow form to repeat checkbox and choose the number of times the form is allowed to repeat in Viedoc Clinic:
• Unlimited times • n times including first instance - enter the maximum number of instances the form will be allowed to have in Viedoc Clinic within the respective activity. This includes the first instance of the form. The maximum number that can be entered is 99.
Notes!
• Randomized, auto update and hidden forms can not be set as repeating. • Only forms within scheduled and unscheduled events can be set as repeating (not within study start or common events). Forms within subject initiated events can not be set as repeating. • Alert trackers for items in repeating forms will trigger as soon as any of the form instances are changed.
For the description of the repeating forms in Viedoc Clinic, see Enter and edit data, and resolve queries.
In order to address an item in a certain instance of a repeating form, theFormRepeatKeycan be used. For more information see Repeating Forms lesson. - Click Save & Preview to save the changes performed and preview the form.
10 Print study workflow to PDF
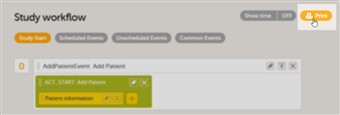
- You can print the study workflow to PDF by clicking the Print button in the upper-right corner of the Study workflow page.
- The first time you print the workflow, the PDF file is generated and stored on the server, so that next time you click the Print button, if no changes were performed on the design, the file is not re-generated, but only retrieved from the server. A new file is generated only if changes were performed to the study design since the last printing.
- If, while printing the study workflow, you perform changes on the study design, then the printing will be canceled and you have to re-initiate it, so that the printed version would reflect the latest changes.
- Since the study image and study name that appear on the first page of the PDF file are being set in Viedoc Admin, the changes performed on these items after the printing was started/performed, won't be reflected in the PDF, as the file is stored on the server and a new one is generated only if changes are performed on the study design.
- The PDF contains a summary of the study (the first page), as well as the events with all the forms as they are set in the study workflow (which means that a form may appear several times according to the set-up in the study workflow).
Note! The items that are hidden in the workflow, won't be shown. The group items that become empty due to the fact that all the contained items are hidden in the workflow, are not shown in the PDF either. - The study summary page contains:
• Study image • Study name - as set in Viedoc Admin. • Internal design description • Design version and revision • Number of unique forms - if a certain form is used multiple times in various events, then it is counted only once. • Total number of forms - the total number of forms used in the study workflow. If the same form appears multiple times in various events, then the total number of appearances is counted in. • The total number of forms within: Study start, Scheduled events, Unscheduled events and Common events. - A summary of each event, in the order set-up in the study workflow is included in the PDF providing the following information:
• Event description • Visit date • Visit window (if applicable) • List of activities and forms - with information on if the form is subject initiated or if it is hidden for certain roles • The forms, in the same format they are shown in the form preview in the study workflow. - The PDF contains bookmarks for the first page of the document (study summary) as well as for each event, activity and form in the study workflow.
- Each page contains in the page header information on the event and activity that the respective form belongs to.