Curriculum 'User Guide Viedoc 4'
Manage translations for subject initiated events Download PDF
1 Overview
- It is possible to translate the forms in the subject initiated events, as well as the respective reminders, by following the steps below:
1. Choose the language(s) the form(s) will be translated to.
2. Export the excel file containing the list of all items in the form to be translated.
3. Perform the translations.
4. Import the file containing the translation. - Please note that Viedoc provides only support for exporting the text for translation and importing the translated file(s). The translation itself is performed outside Viedoc.
2 Set the language(s) for translation
- It is possible to define the default language that was used when setting up the study design, as well as the languages the forms will be translated to.
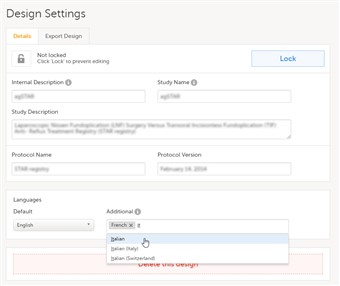
1. In Viedoc Designer, go to the Design Settings section, under the Details tab.
2. In the Languages section, set the following:- Default - choose the default language used in your design (the language used when designing all the events, activities, forms and items). This is the language to translate from.
- Additional - click and select the languages to translate to.
3 Export the form(s) text for translation
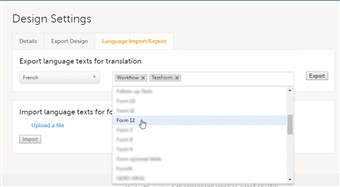
- In Viedoc Designer, in the Design Settings section, under the Language Import/Export tab, in the Export language texts for translation pane:
1. Select the language to translate to from the drop-down list. The available languages in the list are the ones selected as Additional at the previous step.
2. Click and select the forms to be translated, one by one. Make sure that you select the forms included in subject initiated events. The form named Workflow contains all the reminders set up in the study workflow.
3. Click Export. You will get an excel file with one separate sheet for each selected form, containing all the texts for the respective form.
4 Perform the translation
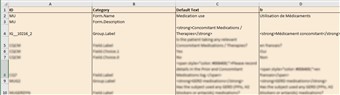
- In the excel file obtained at the previous step, add the translated text in the column to the right. Make sure that only the text is translated and the tags are kept exactly as in the Default text column.
5 Import the translated file
- When the translation is performed and you have the excel file, you have to import it by following the steps below:
1. Go to the Design Settings section, under the Language Import/Export tab.
2. Under Import language texts for form translation, click Upload a file.
3. Browse and select the excel file that contains the translation.
4. Click Import.
6 Important
- If you have performed the translation while working on the training server and intend to import the design to the production server afterwards, in order to have the translations available after the import you have to repeat the following operations on the production server as well:
- add the additional language(s), as described in section Set the language(s) for translation above.
- import the translation file(s) again, as described in section Import the translated file above.
- If you revise your design (e.g. by changing texts that were translated or item IDs) after having performed the translation, make sure to update the translations accordingly and re-import the translated files.