Curriculum 'User Guide Viedoc 4'
Enter and edit data, and resolve queries Download PDF
1 The Details page
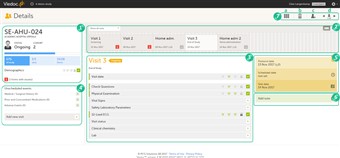
- When you select a subject card on the Selection page, or add a new subject, the Details page opens. The details page provides the following information:
1. the subject details
Note! The subject details view reflects the subject status considering the role visibility, while the selection page does not take into account the role visibility, and therefore the subject status reflects the general status of the subject in the study, regardless of the user who has tasks to be performed. This could result, for example, in a subject status in the details view where a subject could have a green check mark or being locked, while in the selection page it is not (due to some other user role having unfinished work/forms to complete on the respective subject).
2. the visit slider 3. the forms to be filled in during the visit 4. unscheduled events 5. the protocol date, the scheduled date and the visit date 6. private notes 7. a toolbar with the following functions:a. return to the Selection page b. ViedocMe c. add a new subject d. toggle between subjects - You can navigate between visits by selecting the visit in the visit slider.
- Data entry forms are either located under every visit or as unscheduled events on the left side of the page.
2 Initiating a visit
- To enter data on a visit, the visit first needs to be initiated.
- Initiate the visit as follows:
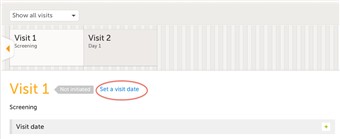
1. On the subject details page, click Set a visit date besides the visit name, or click the visit date form. 2. Click Initiate visit, and select a visit date. 3. Click Save changes. The visit date pop-up closes, and the visit is initiated. The visit status will change to ongoing. - You can add an unscheduled visit as follows:
1. On the subject details page, click Add new visit in the left pane. A pop-up opens. 2. Click Initiate visit, and select a visit date. 3. Click Add visit. The pop-up closes, and the unscheduled visit has been added. - Video tutorial: Initiating and adding new visits Click the link to watch the video.
3 Entering data
- Open a form by clicking the form bar, and complete the questions in the form. Click Save changes to save the data and close the form. Note! When entering decimal values in numeric fields, the separator used must be "." (dot).
- Most fields are self-explanatory when it comes to how they should be filled in. Below, we explain how to fill in fields for dates, times and ranges, and how to upload files.
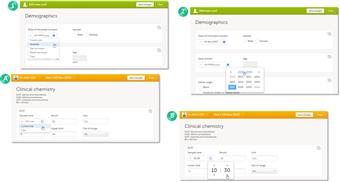
- Dates
You can fill in the date field in two different ways (see image):
To remove a date, click the dropdown menu on the left side of the date field, and select clear.1. Click the dropdown menu on the left side of the date field, and select one of the following options: • visit date • current date (and time) • yesterday • time not known • day not known • month not known 2. Click the calendar icon to open the date picker, and select a date, or: click the month header to view all the months of that year, click the year header to view a range of years, then select the year, month and day. - Times
You can fill in the time field in two different ways (see image):
A. Click the dropdown menu on the left side of the date field to select the current time. B. Click the clock icon on the right side of the time field to open the time picker. Click the arrows to select the hour and minute (with a five minutes time interval), or double-click the hour and minute fields to manually enter any hour and minute. - Range
You can define a range of values by selecting a comparator symbol, and then entering the numeric value(s).
The following comparator symbols are available:
• “-“ – Inclusive in between • “<” – Less than • “≤” – Less than or equal to • “>” – Greater than • “≥” – Greater than or equal to • “=” – Equal - File upload For instructions on how to upload files to the file upload box, see "Uploading files" below.
- Video tutorial: How to enter data Click the link to watch the video.
- When all the forms in one visit are filled in, the visit is considered completed and a green checkmark appears on the visit tab in the visit slider.
4 Uploading files
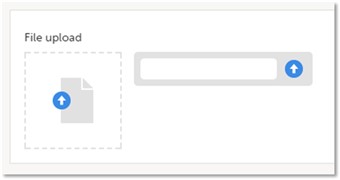
- You can upload a file as follows:
1. Click the arrow on the right side of the upload box, or click the thumbnail if it exists. 2. Browse for the file to be uploaded, and click Open. - During the upload process: • a progress bar is showing the upload status. • you can cancel the file upload by clicking the X button on the right side of the progress bar. • you can continue editing the form. • you cannot close the form until the upload process is completed. • the connection remains active as long as the upload is in progress.
- The uploaded file(s) will be stored once the complete form is saved by clicking Save changes.
- You can download an existing file by clicking the file name or by clicking the thumbnail (if it exists).
- You can remove an uploaded file by clicking the trash can icon on the right side of the file name. If the file has been submitted previously, you will be asked to enter the reason for the change.
- Note!
• The file upload icon will display a thumbnail of the image if a jpeg, gif or png file is uploaded. If other file types are uploaded, the icon will only show the file extension.
• The maximum allowed file size is 512 MB.
• The upload of password-protected zip files is not supported.
• For security reasons, it is not possible to upload executable files. The complete list of unsupported file types can be found in the Release Notes Viedoc 4.34.
5 Recurring events
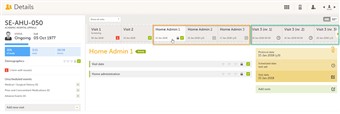
- Recurring events are events that are scheduled to occur multiple times.
- All instances of a recurring event are displayed in the visit slider. See for example the three instances of Home Administration and the three instances of Visit 3 in the image .
- You can initiate a recurring event in the same way as you initiate a regular event.
6 Repeating forms
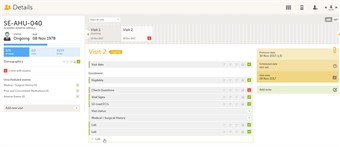
- It is possible to create several instances of the same form within one activity. This can only be done if the form is set as repeating in the study design.
- If a form is set as repeating, a ghost form will appear once you have filled out and saved the first instance of the form (see the lab form example in the image).
- To fill out the repeating form, click the ghost form. A new instance of the form opens. Fill in the form and click Save changes. The form closes, and the newly created instance of the form is displayed in the list of forms.
- If you have not reached the maximum allowed number of instances of a repeating form, a ghost form will appear every time you save a new instance of the form. If the maximum number of instances of the repeating form has been reached, no ghost form will appear upon saving a new instance of the form.
- To delete an instance of a repeating form, open the form and click Edit. Click Delete form. Select or enter a reason for deleting the form, and click Delete. The instance of the form is removed.
- Note! It is not possible to reset a repeating form. If you wish to clear the data, it is only possible to completely delete that specific instance of a repeating form and create a new one again.
- Note! In order for the visit to be considered as completed, at least one instance of a repeating form has to be filled in.
7 Confirming data as missing
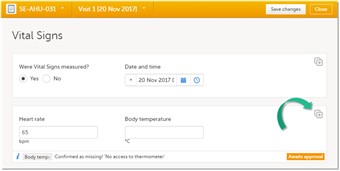
- If you are not able to provide information on a field, you can mark the data as missing. Follow the steps below:
1. Click the action icon located in the top right corner of each group (see image). A pop-up opens. 2. Select the field for which data are missing in the dropdown menu. 3. Select Confirm field is missing, and provide a reason. 4. Click Ready. - Below the field, the text "Confirmed as missing" is displayed, together with the reason for why the data are missing. You can easily proceed with completing the other fields.
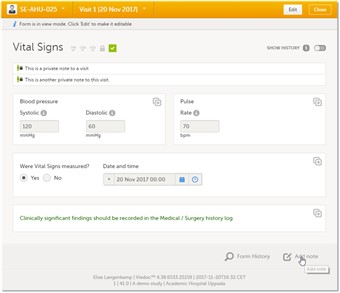
8 Private notes for visits
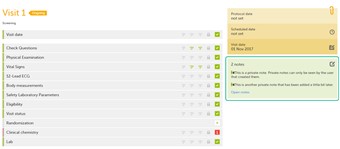
- You can add private notes to every visit. Note that it is only possible to add private notes if this feature is enabled for your role.
- Private notes are only visible to the user that created the notes, and can only be edited by that user. Adding or editing a private note does not break the signature.
- It is possible to add as many notes as you like. Notes are ordered according to date in descending order.
- To add a private note for a visit, click Add note on the right pane of the subject details page. Enter a text and click Ready. Click Save changes. The notes pop-up closes and the note is displayed in the right pane of the subject details page.
- To add another note, click Open notes and click Add another note. Enter a text and click Ready. Click Save changes. The notes pop-up closes and the new note is displayed in the right pane of the subject details page.
- To edit a note, click Open notes, and click the pen icon behind the note you wish to edit. Edit the text and click Ready. Click Close to close the notes pop-up.
- To delete a note, click Open notes, and click the trash can icon behind the note you wish to delete. Click Save changes. The notes pop-up closes.
- To see a history of changes to private notes, activate the Show history switch.
- Private notes are not recorded in the audit trail, neither included in the data export.
- Note that to be able to create private notes, you need permission. The right to create private notes is activated in the study design by the study builder.
9 Private notes for forms
- You can add private notes to every form. Note that it is only possible to add private notes if this feature is enabled for your role.
- Private notes are only visible to the user that created the notes, and can only be edited by that user. Adding or editing a private note does not break the signature.
- To add a private note for a form, click Add note on the bottom of the form. Enter a text and click Save note. The notes pop-up closes and the note is displayed on the form.
- To edit a note, click the note and click Edit. Edit the text and click Save note. The notes pop-up closes and the note is edited.
- To delete a note, click the note, and click Remove. Click Save note. The notes pop-up closes and the note is deleted.
10 Resolving a query
- A query is a question about data. Queries can be raised by the system during data entry, for example when data are entered that are outside specified limits and an edit check fires. Queries can also be raised manually by a user that has privileges for raising a query, after the form has been saved.
- If a query is raised during data entry, a query message will appear as soon as you leave the field. To resolve the query, click the query message for more details, or correct the data directly before you continue entering data in the rest of the form.
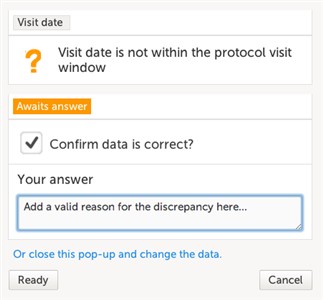
- If a query is raised after the form has been saved, the form is marked with a red issue ("i") icon. To resolve the query:
1. Open the form that contains a query. 2. Click Edit in the top right corner of the form. 3. If the entered data are not correct, enter a new value in the field that has a query. 4. If the entered data are correct, click the query message, check the Confirm data is correct checkbox, and enter an answer. Click Ready, and click Save changes. - Video tutorial: Issues and Queries Click the link to watch the video.
11 Editing data
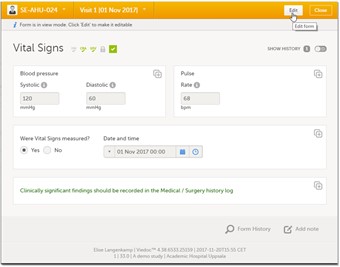
- To edit data that already have been saved, follow the steps below:
1. Open the form that contains the data you wish to change. 2. Click Edit in the top right corner of the form. 3. Edit the data and click Give reason. A pop-up will appear. 4. Select one of the pre-formulated reasons for change, or click Other reason and provide a description. Click Ready, and click Save changes. - Note! A form that has been locked by the monitor or data manager cannot be edited. If you anyway wish to edit a locked form, contact your local monitor.
12 Audit trail and Form history

- You can view the complete history of a form, including information on who entered the initial data and who made any changes. To view the history, activate the Show history switch on the top right side of the form.
- You can download PDFs of all the saved versions of the form by clicking Form history located on the bottom left side of the form.
- If any of the fields in the form are hidden for your role, you are not able to see the form PDFs.