Curriculum 'User Guide Viedoc 4'
Selection Download PDF
1 Overview
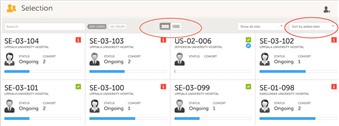
- On the selection page all subjects from all sites you have access to are displayed. Each subject is represented by a card. By default the cards are sorted by added date, where the most recently added cards are displayed first. You can override the sorting by changing the "sort by..." drop-down on the top right side. Your newly selected settings will then be kept throughout the session.
If you prefer to see all subjects in a traditional subject listing, use the toggle in the middle of the page. This view contains a few more variables for every subject which might help you in choosing the correct subject.
Access to several sites? By using the site selector you can choose to display only subjects from one site and focus only on those.
2 Card info
- On each card a lot of information is displayed. Apart from the study progress indicated by the blue progress bar, the following information can be found:
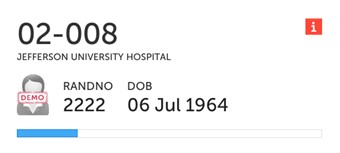
• Subject ID
• Site name
• Gender of the subject indicated by an avatar
• Some CRF data
• Icons indicating subject data statuses, see also icons below
All or parts of this information will hopefully make it easier for you to select the appropriate subject.
Note! The selection page does not take into account the role visibility, and therefore the subject status reflects the general status of the subject in the study, regardless of the user who has tasks to be performed. The subject details view is the one that reflects the subject status considering the role visibility. This could result, for example, in a subject status in the details view where a subject could have a green check mark or being locked, while in the selection page it is not (due to some other user role having unfinished work/forms to complete on the respective subject).
3 Icons
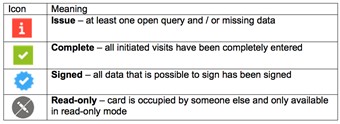
- In the top right corner of a card, you might find icons that provide useful information of the subject.
Issue: An issue is an indicator and summary icon for queries and missing data. All issues should eventually disappear but while being present they help you identifying where action is needed.
Complete data entry: When seen, this icon indicates that all available data is completely and correctly entered. Alternatively, no icon indicates that data is to be entered for this subject.
Complete signing: All available data is signed by the investigator. No icon indicates that there is data still unsigned.
Please refer to the image to the right for a full description of each icon.
4 Add new subject

- To add a new subject, click on the new card icon. There are two places where you could add a new subject. One is the last card on the page and the other is located on the top right side of the page. Once clicked you will see the first form in the study. Complete the form and click save on the top right side of the page.
- Video tutorial: Add and Select a Subject - Click link to play video
5 Searching a subject
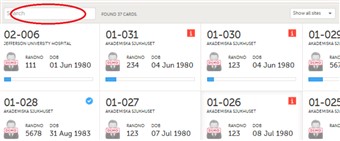
- If you would like to search for a specific subject or any other information collected for a subject you can use the search field and type the text you are looking for there. By entering "headache" or "male" the system will return only subjects having a headache entered in the CRF or only all males in the study.