Curriculum 'User Guide Viedoc 4'
Overview of Viedoc Admin Download PDF
1 Organization overview
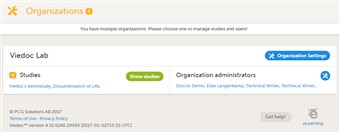
- For the organization administrator, the first page shown when accessing Viedoc Admin is the organization overview.
- On this page, you can: • Edit the Organization settings, for example update the contact details for the organization. • View or access all studies within the organization. Click Show studies to view a detailed list of all studies, or click on the name of a study to directly access the study. • View a list of all organization administrators, and invite users to the role of organization administrator. Click the toolbox icon to open the organization administrators pop-up. For more information about how to assign organization administrators. see the eLearning section about User Management.
2 Overview of studies
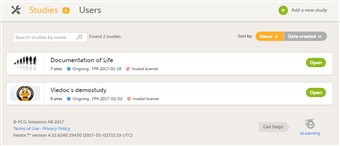
- For all users that are not organization administrator, the first page shown when accessing Viedoc Admin is the study overview.
- For each study, the following information is displayed: 1. The logo of the study 2. The name of the study 3. Some study details: • the total number of production and training sites • the study status • the date of first patient added (FPA; only for production sites) • the status of the study license.
- A study can have three statuses: • not commenced • ongoing • locked
- A study needs to have a valid license to be taken into production. For more information about how to take a study live, see the eLearning section Add new study. For more information about the study license, see the chapter about licensing in the elearning section System overview.
- You can search for a study by entering the study name in the search field.
- You can sort the studies by study name or by date the study was created.
- Click a study to access the study details page.
3 Study details page
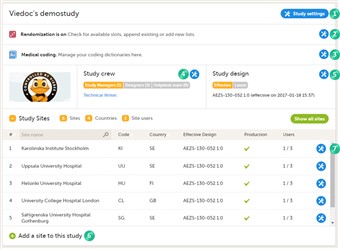
- On the study details page, you can (see image): 1. Edit study settings, see below for more information. 2. Manage the randomization lists, see Configuring randomizations. 3. Manage medical coding dictionaries, see Managing medical coding dictionaries. 4. Manage the study crew, see User management. 5. Apply study design versions and revisions. 6. Add study sites, see Managing study sites. 7. Edit the study site settings and invite users to the study site, see User management.
4 General study settings
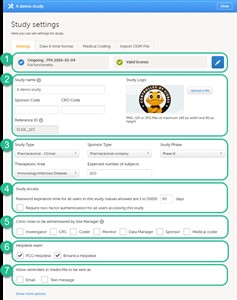
- To open the study settings pop-up, click the Study settings icon on the study details page.
- On the Settings tab, you can (see image): 1. View the study status and the status of the study license. 2. Enter details of the study: study name, sponsor code, study logo, and the reference ID (for information about the reference ID, see the chapter about licensing in the elearning section System overview). 3. Enter a description of the study. 4. Manage the study access settings: configure the password expiration time, and activate two-factor authentication for all users in the study. 5. Select the clinic roles that are to be administered by the site manager instead of the study manager, see the eLearning section about User management. 6. Manage the helpdesk settings, see the eLearning section about Assigning a helpdesk. 7. Select whether Viedoc reminders should be sent as e-mail and/or text message.
- About the password settings: If a user has access to more than one study, the password settings for all studies are checked upon login. If the password expiration settings for any of these studies dictate that the password is expired, the user is redirected to the Change password pop-up and is forced to change his/her password. An internal message will notify the user about the password expiration time ten days in advance. The password expiration time can be set to any value between 1 day and 5000 days.
- About two-factor authentication: The use of two-factor authentication provides an extra security measure at login. After entering the user name and password, the user is required to enter an extra authentication code that he/she received via text message or e-mail to be able to login.
5 Data export compatibility with previous Viedoc versions
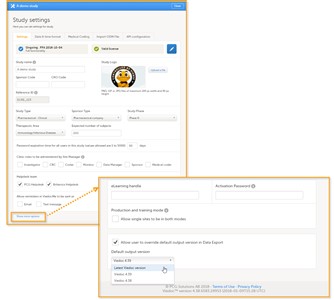
- When exporting data, Viedoc offers the possibility to create a data export file that is compatible with files exported from previous versions of Viedoc. The default Viedoc version that is used when exporting data can be set in Viedoc Admin.
- Set the Viedoc version to be used for data export as follows:
1. In Viedoc Admin, click Study settings to open the study settings pop-up. 2. On the Settings tab, click Show more options. 3. Select the default output version from the dropdown menu. 4. If you would like to allow clinic users to be able to override the default output version and select the output version themselves, activate the checkbox Allow user to override default output version in Data Export. 5. Click Close to save the changes. - The Viedoc versions available in the Default output version dropdown menu are those in which changes to the data structure were introduced. As of Viedoc release 4.39, the following output versions are available:
Output version Changes in data structure Latest Viedoc version When choosing Latest Viedoc version, the exported data will automatically follow the structure of the latest Viedoc release in which changes to the data structure were introduced. Viedoc 4.39 Introduction of repeating forms and recurring events, see the table below for details. Viedoc 4.38 Original output format - In Viedoc 4.39, the following changes to the export output were introduced.
File type Changes in the output format Excel Addition of a column for Form sequence number (FormSeq) that contains the FormRepeatKey. ODM The FormRepeatKey now contains the activity ID as well, in the following format: FormRepeatKey$ActivityId. The ExportVersion attribute has been added to the ODM. PDF The summary formats are used to display the event and form names.
6 Date and time format
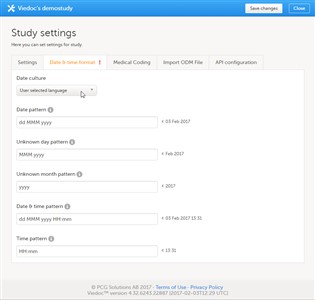
- On the Date & time format tab of the study settings pop-up, you can edit the format of date and time used in all fields displaying a date and/or time in Viedoc.
- You can edit the date and time format by choosing a language. The date and time format will then follow the format generally used in the selected language.
- You can also edit the date and time format manually by typing a pattern in one or more of the date and time fields.
- Click Save changes to save the settings and close the pop-up.