Data mapping for import of data Download PDF
1 About importing data into Viedoc 4
- Viedoc offers the possibility to import data, for example laboratory data, via the Viedoc 4 Data Import Application. The Viedoc 4 Data Import application does the following: • it converts the provided data into CDISC ODM clinical data format using a data mapping file, and • it pushes the data into Viedoc through the Viedoc 4 API.
- In order to import data into Viedoc, the following is needed: • a data mapping file • a configuration file • the Viedoc Data Import application • a valid Viedoc username and password, and a study-specific Viedoc 4 API client key • the data to be imported, supplied in a CSV (comma-separated value)-file
- The data mapping file defines how the external data will be mapped to form items in Viedoc. Internally, the data mapping will be stored in CDISC Define-XML format.
- The configuration file is an xml file that defines: • where to find the data mapping file, • where to find the data that will be imported, • into which Viedoc study data will be imported, • which API instance the data should be imported into, • the login credentials that will be used when importing the data. In the configuration file, you can also define whether you would like new subjects to be created automatically during the data import, when the imported data contain data for a subject that has not been added to the study yet. It is also possible to define whether you would like visits to be initiated during the data import, when the imported data contain data of visits that have not been initiated yet. One configuration file can contain the import configurations for multiple studies.
- The import of laboratory data into Viedoc using the Viedoc 4 Data Import Application involves the following steps:
1. Creating a data mapping file in Viedoc Designer. 2. Creating a Viedoc 4 API client key in Viedoc Admin. 3. Creating a configuration file (not in Viedoc). 4. Preparing the work folder. 5. Installing the Viedoc 4 Data Import Application. 6. Dropping data into the work folder. 7. Running the Viedoc 4 Data Import Application. - This chapter describes how to create a data mapping file in Viedoc Designer. For more information on how to use the Viedoc 4 Data Import Application, see the Viedoc 4 Data Import Application document. The Viedoc 4 Data Import Application document is available on request, please contact PCG Solutions AB.
2 Description of the data mapping file
- The data mapping file is created in Global design settings in Viedoc Designer. It describes each column in the CSV file, and how and where the data should be imported into Viedoc.
- A separate data mapping file should be created for each study. It is possible to create more than one data mapping per study.
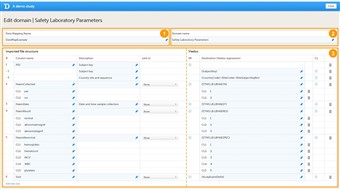
- The data mapping window in Viedoc Designer has the following main fields (see image):
1. Data Mapping Name, a name (free text) for the data mapping. 2. Domain Name, the SAS domain that will be stored in the Define-XML file according to the CDISC standard. 3. Data mapping table, that has two main parts: • Imported file structure, describing each column of the CSV file to be imported. • Viedoc, describing how and where the data should be imported into Viedoc. - The data mapping table has the following columns:
Column name Description # Number of the column in the CSV file to be imported. Column name Name of the column in the CSV file to be imported. Description Description of the parameter in that specific column to be imported (free text). Link to Links the content to a parameter defined in another column in the CSV file. This is mainly used when importing data in a tall-skinny format. IM Item mapping: inserts more rows into the table so that one CSV column can be mapped to multiple destinations in Viedoc. Destination Address in Viedoc into which the data should be imported. This directs the data to the correct patient, visit, form and field. CL Code list: a list of codes and their definition.
3 Creating the data mapping file
- Follow the steps below to create a data mapping file.
1. In Designer, scroll to the study for which you would like to create a data mapping file. 2. In the Global design settings field, click Edit to open the global design settings. 3. In the Data mappings field, click Edit to open the data mappings overview. 4. Click Add new data mapping, orif a data mapping has already been created, select the data mapping that you would like to edit. 5. Type a name for the data mapping in the Data Mapping Name field. 6. Type a domain name in the Domain name field. 7. Click Add new row to add a new row to the table, and fill out: • Column name of the first column of the CSV file. • Description of the first column of the CSV file. • Destination in Viedoc of the data in the first column of the CSV file. For more information on how to correctly map the patient ID, visit ID and laboratory data, refer to the sections below. 8. Repeat step 7 with the next column in the CSV file, until all the columns in the CSV file are described in the data mapping table. If you would like to link the contents of the current row to the contents of another row, select the row to link to from the Link to dropdown menu. This is mainly used for data in tall-skinny format. Choosing Link to automatically creates rows with the same code list items as the row that is being linked to. Linked rows can be updated by clicking on the refresh button. 9. Click Save changes, and click Close to close the data mapping table. 10. Click Close to exit the data mappings overview. 11. Click Publish settings in the global design setting window to publish the changes. 12. In the Data mappings field, click Edit to open the data mappings overview. 13. Click the Download icon behind the data mapping that you just created. An xml file will be downloaded that contains the data mapping. 14. Save the xml file in the work folder. - You can enter more mapping details by clicking the +-icon in the IM column. This adds extra rows to the table that can be used to map the data to more than one destination in Viedoc.
- You can enter code list items by clicking the +-icon in the CL column. Code list items define how values in the CSV file should be translated into values in Viedoc. Code lists are also used to specify the address for data in tall-skinny format. When mapping data using code lists to a form where multiple check boxes can be activated in one field, it is only possible to map the data based on choice number, not based on choice label. It is for this reason only possible to import values, not strings.
- Only the fields with a light blue background can be filled in.
- You can remove a table row by clicking on the trash can icon.
- You can import and edit an existing Define-XML file by clicking on Import data mappings in the Data mappings overview. Select the file you would like to import and click Open. Edit the data mapping table if necessary and click Save changes to save the data mapping.
- You can remove existing data mappings in the Data mappings overview by clicking Delete. It is not possible to delete a data mapping that has already been published.
4 Mapping the patient ID
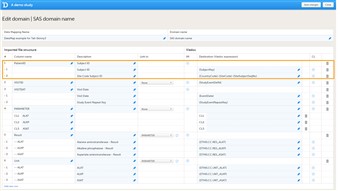
- The subject ID should be mapped to {SubjectKey}, see image. Note that the mapping is case sensitive!
- If the country and site code should be extracted from the subject ID, it is necessary to map the format used for the subject ID, for example: {CountryCode}-{SiteCode}-{SiteSubjectSeqNo} The format of the subject ID is defined in the Subject Id Generation Settings in the Study Settings in Viedoc Designer. Click here for more information. If the CSV file contains separate columns for country code or site code, it is not necessary to specify these in the subject ID.
- Viedoc can only correctly identify the country and site codes within a subject ID if these are separated with a hyphen. If the country and site codes are not separated with a hyphen, these should be included in separate columns in the CSV file, and mapped to {SiteCode} and {CountryCode} respectively.
5 Mapping the visit ID and event date

- For scheduled events, the visit ID should be mapped to {StudyEventDefId}, see image. Note that the mapping is case sensitive!
- The date of the event can be mapped in two different ways: • Mapping to {EventDate}{EventDate} is used to match the imported event date with the scheduled event, and to initiate events if the visit has not been initiated yet. If the visit has been initiated, the Viedoc Import Application checks whether the date in the CSV file matches with the existing visit date. If the dates are matching, the data will be imported. If the dates are not matching, the data will not be imported. • Mapping to {$THIS.$EVENT.EventDate}{$THIS.$EVENT.EventDate} is used to update the event date. If the visit has been initiated, the Viedoc Import Application will update the existing date with the new date. Note that for matching the events, it is necessary to map the original event date to {EventDate} as well, so that the system recognizes which event should be updated.
- For unscheduled and common events, the event date should be mapped to {StudyEventDefId}, along with either {EventDate} or {StudyEventRepeatKey}. The event will then be matched either on event date or on event sequence number. If the event has not been initiated yet, the event date will be imported and/or an event sequence number will be created.
- You can also map data to a certain activity within a visit using the Activity ID. This is useful when the same form is used in two different activities within the same event, for example before and after administration of a drug. The Activity ID should be mapped to {FormRepeatKey}.
6 Mapping the data
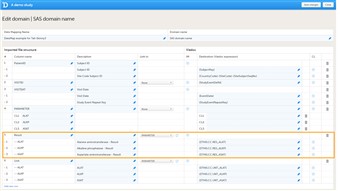
- The data, for example laboratory results, should be mapped to the correct form and field ID, see image. The mapping of these data is also case sensitive.
- In the example in the image, the laboratory results of the alanine aminotransferase serum levels are mapped to {$THIS.CC.RES_ALAT}. This is build up as follows: $THIS maps the data to the visit as defined earlier on in the mapping.CC is the ID of the form that the data should be imported into. RES_ALAT is the ID of the field in the form that the data should be imported into.
- You can also specify a scheduled event explicitly in the data mapping. For example, it is possible to map the above data directly to Visit 1 using {V1.CC.RES_ALAT}. In that case, the visit ID does not have to be included in the CSV file, and, hence, the visit ID does not need to be mapped to {StudyEventDefId}, because the event is already specified in the destination of the data.