Curriculum 'Monitor Training Program (V4)'
Manage users (site managers only) Download PDF
1 General - introducing the Site Manager
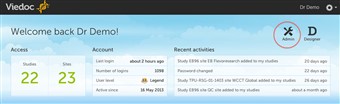
- If you have been appointed the Site Manager (SIM) role, you also have access to the administrative part of Viedoc, Viedoc Admin. You can access Viedoc Admin by clicking the Admin icon on the top right side of the landing page.
- As a SIM you are able to invite and manage the staff on the sites you are responsible for. Remember that access to Viedoc Clinic is by invitation only. It is your responsibility to invite only users that should have access and have been properly trained.
- IMPORTANT! As a Site Manager, you need to ensure that all users you invite are informed, and certify, that all electronic signatures created in the system are intended to be the legally binding equivalent of a traditional handwritten signature.
- As a SIM, you can review all study settings in Admin but only add or delete access of users to roles at the sites you are responsible for.
- It is the responsibility of the Study Manager (STM) to appoint SIMs in the project. The STM is also responsible for adding sites, invite other non-site-specific users, and handling study designs and amendments to the individual sites. Every study has at least one STM and that person is normally the Project Manager for the project.
2 Overview of Viedoc Admin
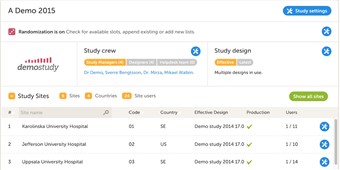
- Study page - from this page you are able to access all necessary functions for the project; study settings, crew, study designs and sites. As a SIM most of the features are only available as read-only.
3 Invite users
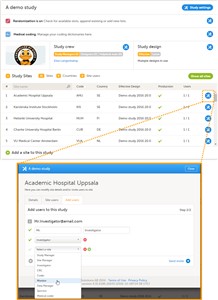
- To invite users to a specific site, follow the steps below:
1. Click the toolbox icon behind the site to which you would like to invite users. The site settings pop-up opens. 2. In the Add study users tab, enter the e-mail address of the user you would like to invite. Click Continue. Tip! You can invite multiple users at once by adding multiple e-mail addresses in the field. Separate the e-mail addresses with a semi-colon or comma. 3. • If the user does not yet exist, enter the first name and the last name. • If the user already exists in the organization, the first name and last name of the user and the roles that this user already has access to are displayed. 4. Select the role to which you would like to invite the user. You can add multiple roles by clicking the + icon. Newly added roles can be removed by clicking the - icon. 5. Click Send invite. An invitation e-mail will be sent to the e-mail address(es) you specified.
4 Find out the status of a user
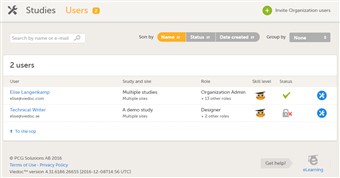
- If you are not sure whether a user has activated the account or not, click Users in the top bar. The Users tab displays a list of all users within all studies and sites in the organization. You can search for a specific user by entering the user’s name or e-mail address in the search field.
- The status of users is displayed in the status column:
Status Indicated by Inactive (account not created) red question mark Active, logged in green check mark Active, not logged in grey check mark Active, locked out lock icon
5 Remove access of a user
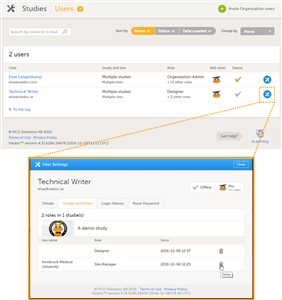
- If a user is invited to an incorrect role, the access can be removed.
- To remove the access from users, follow the steps below:
1. On the Users tab in the top bar, scroll to the user whose access you would like to remove. Click the toolbox icon behind the name of the user. The User Settings pop-up opens. 2. In the Studies and Roles tab, scroll to the study, site and role for which the access should be removed. Click the trash can icon. A pop up appears. 2. Click Delete to confirm that the access should be removed, or click Cancel to cancel. The user and role for which you removed the access, will be removed from the Studies and Roles list. - Any records generated by the user are stored in the audit trail even when the user has been removed.
6 Unlock a user account
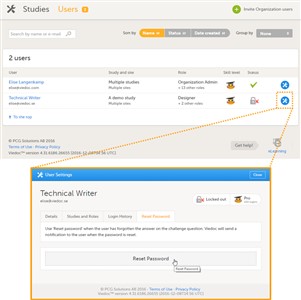
- If a user has typed in the wrong password more than three times, and forgotten the answer to the challenge question – and therefore cannot use the Forgot your password link – the account will be locked. As a site manager, you can unlock a locked account.
- To unlock a user account, follow the steps below:
1. On the Users tab in the top bar, scroll to the user whose account you would like to unlock. Click the toolbox icon behind the name of the user. The User Settings pop-up opens. 2. In the Reset Password tab, click Reset Password. The user will receive an e-mail with a link to reset the password. - The link directs the user to a window where the user is asked to set a new answer to the old challenge question, and to create a new password. Once the password has been reset, the user can login and select a new challenge question in the security settings.
- Note! The email with the link to reset the password is only valid for twelve hours. If the user has not reset the password within twelve hours, a new e-mail needs to be sent.