Curriculum 'User Guide Viedoc 4'
Migrate from V3 to V4 - quick workout Download PDF
1 Prepare for design and data export from Viedoc 3
- Log into Viedoc Project Controller
- Select project
- Go to Project Configuration > Settings > Options
- Tick checkbox "Allow CDISC ODM export ☑" and Update
2 Export design and data from Viedoc 3
- Log into Viedoc
- Launch project with data manager role
- Go to study export
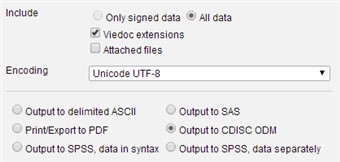
- Select
- All patients
- All forms
- All visits
- Output to CDISC ODM
- Viedoc extensions
- Unicode UTF-8
- Download and unzip resulting XML file
3 Create study in Viedoc 4
- Log into Viedoc 4
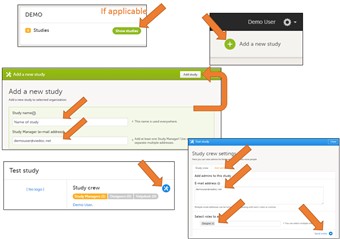
- Open Admin app
- If you have access to multiple organizations, click Show studies on the organization applicable
- Click Add study in the upper right corner
- Fill out Study name and Study manager (your email address) fields
- Click Add study
- Click blue toolbox icon in Study Crew box
- Click Add admin tab, add email address of designer (your email address), select Designer in roles and click Send Invite.
4 Import design in Viedoc 4
- Go back to Viedoc 4 start page and open Designer app
- If you have access to multiple organizations, click Show projects on the organization applicable
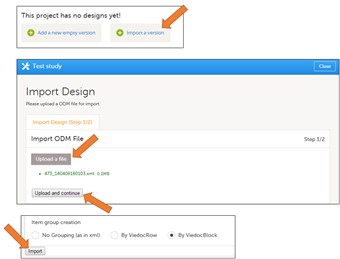
- On the newly created project, click Import a version (if you already have designs imported in the project, first click Show All in the Design versions box)
- Click Upload a file and select the Viedoc 3 export XML. Wait until file is uploaded and text is green.
- Click Upload and continue.
- Scroll down to bottom and click Import
5 Perform touch up on the design in Viedoc 4 and publish
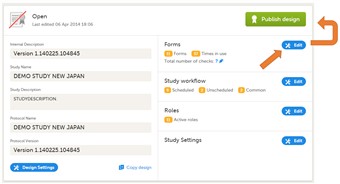
- Make the necessary changes to the form layout - but do not change any ID:s. Pay extra attention to check box lists and item groups with multiple items - texts might be redundant.
- Publish design
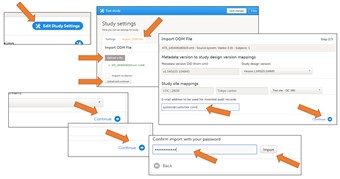
6 Import data in Viedoc 4
- Go back to Viedoc 4 start page and open Admin app
- If you have access to multiple organizations, click Show studies on the organization applicable
- On the newly created study, click Edit Study Settings
- Click Import ODM File tab
- Upload the same Viedoc 3 export XML. Wait until file is uploaded and text is green.
- Click Upload and continue
- Enter an email address to be used to when import need to create audit-records (rare cases). E.g. "system@customer.com"
- Click Continue, Continue, Continue
- Enter your password and click Import
- Click Close and refresh page.
- To verify, click Show sites and add yourself to any site using the blue toolbox icon, so that you can log on and look at the data.