Curriculum 'User Guide Viedoc 4'
Manage your Viedoc account Download PDF
1 Account activation
- The first time you are invited to be part of a study in Viedoc, you get an invitation by email, containing an activation link. When clicking the link in the invitation email you enter a two step account activation procedure:
- Step 1: Read and accept the Terms of Use and the Privacy Policy. Check the checkbox and click next when done.
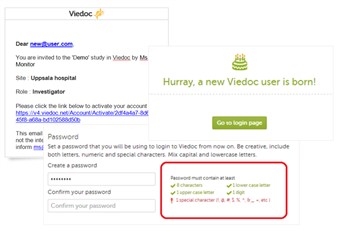
- Step 2: Provide your first and last name. Then set a password for your account. The password must be strong. The indicators to the right inform you when you have fulfilled all requirements for a strong password. Confirm the chosen password by typing it in again in the confirm password field. Continue by setting a challenge question and answer. Make sure the answer is something you always remember. Finally, finish off by providing your phone number where we can reach you in case we need to contact you. Click next.
- Your account is now created and you can start working.
- Video tutorial: How to activate the user account. Click the link to play the video.
2 Log in
- To log in into Viedoc, follow the steps below.
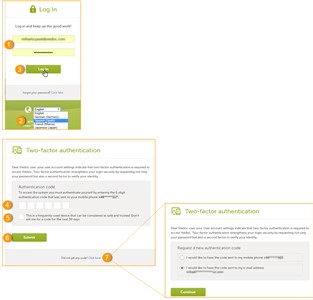
- Enter your primary e-mail address and your password (1).
Note! After entering a wrong password 3 times in a row, your account will be locked. - Optionally, select your language from the dropdown list (2).
- Click Log In (3) to access Viedoc.
- Two-factor authentication
In case of using two-factor authentication (See Security settings section below), you will be prompted to enter a security code before given access to Viedoc.
The two factor authentication page opens and you will be required to enter the authentication code (4) you received via email/text message, according to your settings in Security settings.
In case you did not receive an authentication code or you want the code to be sent out using the other method than the one set up in Security Settings (for example, if it is set to text message and you want to get the code by email), you can click the link next to Did not get any code? (7) in the bottom of the pop-up. A new dialog opens where you can select how you want the new authentication code to be sent out.
A new authentication code can be requested up to 5 times.
After 3 failed attempts to enter the correct code the user account will be locked.
Trusted device Optionally, you can check the This is a frequently used device that can be considered as safe and trusted. Don't ask me for a code for the next 30 days (5). If checked, you won't be asked again for the authentication code for the next 30 days when logging in with the same user name from the same device using the same browser, unless the browser session is in private mode or the cookies are cleared. The trusted devices list is shown in Security settings. After a password recovery, all the trusted devices are removed. - If any of the Privacy policy or Terms of use changed since last login, you will be prompted to read and accept the new terms.
- Video tutorial: Log in/out and reset password. Click the link to play the video.
3 Password recovery
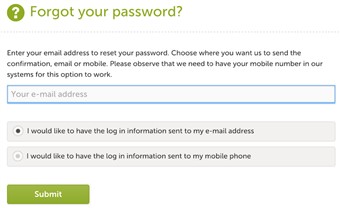
- In the case you have forgotten your password, click the link "forgot your password?" on the log in page. By providing your email address the system will send you a password recovery email. To be able to reset your password you need to know the answer to the challenge question set during account creation.
Please observe! For security reasons, the password recovery email is only valid for 3 hours. Whenever 3 hours have passed and you haven't reset your password, you have to ask for a new recovery password email.
If you have forgotten also the answer to the challenge question you need to contact your local monitor who will help you to access the system.
4 Pending invitations
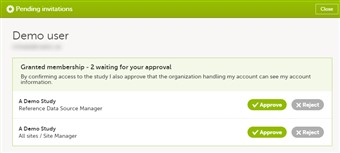
- In case you have study invitations that you have not accepted or rejected yet, the Pending invitations pop-up will display a list of all your pending study invitations, where you can accept or reject each of the invitations, as shown in the image.
- To accept/reject the invitation(s):
- Click Approve to accept the invitation. If this is the first role you have in the respective study, and if the study requires an activation password, you will be prompted to enter it.
- Click Reject if you don't want to accept the role invitation.
- To close the Pending invitations pop-up and postpone the approval/rejection of study invitations, click Close in the top right corner to close the Pending invitations window and postpone providing an answer to the study invitation.
- The Pending invitations pop-up will be automatically displayed again after log in,as long as there are pending invitations.
- If you have pending invitations and you choose to close the Pending invitations pop-up, this can be accessed at any time by clicking the Pending invitations link on top of the landing page.
5 User settings
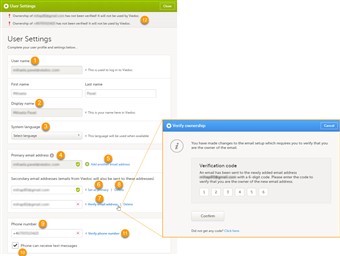
- Once logged in, you can edit your profile. To view and/or edit your user settings click the settings button (wheel) in the top right corner of the window, and select Edit your profile.
- User name (1) - this is your primary email address used for your Viedoc account. This is the user name you use to log in to Viedoc. See below information on primary email address.
- First name and Last name - fill in these fields that will be used to compose the Display name (2) which will be used in Viedoc to identify your user.
- System language (3) - select the language of your choice from the drop-down menu.
- Address - fill in your address: Street address, City,Postal code, Country and State.
- Click Save changes to apply the modifications performed to any of the above described fields.
- Primary email address (4) - this is the same as the User name described above. It is the email address used in Viedoc to log in, as well as for Viedoc user account related operations (account set-up, password recovery, study invitations).
By default, this is set to the email address used to initiate the Viedoc user account.
The primary email address must be unique and it is mandatory, therefore it is not possible to delete the primary email address. - Secondary email addresses - you can add up to 3 additional email addresses that will be used by Viedoc to send out notifications on alerts and trackers as configured in Viedoc Designer. Viedoc alert emails will be therefore sent out for all the primary and verified secondary email addresses set up for your account.
To add a new (secondary) email address to your account:- Step 1. Click Add another email address (5) next to the current primary email address.
- Step 2. Enter the email address in the new field under Secondary email addresses.
- Step 3. Click Save changes. A notification email is sent out to both the primary email address and to the newly added email address to inform you about the change. In the Edit your profile you will see a warning message in the top of the pop-up saying that the newly entered email addresses is not verified (12).
- Step 1. Click the Verify email (7) link next to the newly added email address. A 6 digits code will be sent to your new email address and a Verify ownership pop-up is displayed asking you to provide the code in order to verify the new email address. Note! The verification link for the secondary email address is shown only after having saved the other changes you may have performed on the other fields on the same page.
- Step 2. Enter the received code and click Confirm. The newly added secondary email address is now verified.
To delete an existing secondary email address:- Step 1. Click Delete (8) next to the secondary email address that you want to remove.
- Step 2. Click Save changes. A notification email is sent out to both the primary email address and to the deleted email address to inform you about the change.
- To change the primary address to one of the existing secondary email addresses:
- Step 1. Click Set as primary (6) next to the secondary email address that is to be set as primary.
- Step 2. Click Save changes. A notification email will be sent out to both email addresses to inform you about the change. You will use the new primary email address next time you log in to Viedoc.
- Phone number (9) - enter your phone number in format "+CountryCodePhoneNumber" (e.g. +46123456789).
To add/edit your phone number:- Step 1. Enter the number in the Phone number field in format "+CountryCodePhoneNumber" (e.g. +46123456789).
- Step 2. Click Save changes. A notification email will be sent out to your primary email address to inform you about the change.
• the Phone can receive text messages (10) must be checked, and • the phone number must be verified.
To verify a mobile phone number:- Step 1. Make sure that the phone number is correctly entered and that the Phone can receive text messages option is checked.
- Step 2. Click the Verify phone number (11) link. A 6 digits code will be sent as text message to your phone and a Verify ownership pop-up is displayed asking you to provide the code in order to verify the phone number. Note! The verification link for the phone number is shown only after having saved the other changes you may have performed on the other fields on the same page.
- Step 3. Enter the code and click Confirm. The phone number is now verified.
6 Change password
- To change your current password, click the settings button (wheel) in the top right corner of the window, and select Change password. The Change password pop-up opens.
- Enter the Current password.
- Enter the new password in New password and Confirm new password fields. The indicators to the right inform you when you have fulfilled all requirements for a strong password.
- Click Save changes.
Note! After entering a wrong current password 3 times in a row, your account will be locked. - The process is similar for the case when the password expires and you are required to change it.
7 Security Settings
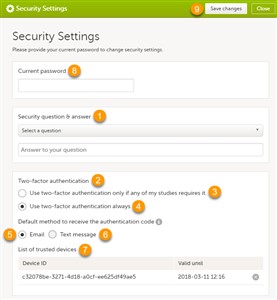
- Click the settings button (wheel) in the top right corner of the window, and select Security settings. A pop up opens where you can change your security question and/or configure the two-factor authentication settings.
- Security question & answer (1) - here you can change the security question and answer that you first set when you created your account. This is used for password recovery.
- Two-factor authentication (2)
Choose when you want to use two-factor authentication:- only if any of your studies requires it (3)
- always (4)
Select if you want the authentication code to be sent via:- Email (5) - the authentication code will be sent to your primary email address, as set in User settings.
- Text message (6) - to the verified phone number set in User settings. Please note that Phone can receive text messages option must be checked in User settings order for the authentication code to be able to be sent as a text message.
- List of trusted devices (7) - the list of devices you have marked as "trusted" at log-in time (see Log In section above).
To remove a trusted device from the list, click on the delete button next to the right of the respective entry and click Save changes. - Type in your password in the Current password (8) field and click Save changes (9) to apply the changes you made.
8 Access settings
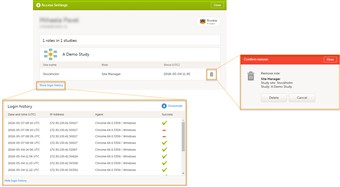
- Click the settings button (wheel) in the top right corner of the window, and select Access settings. A pop-up opens where you can view a complete list of your study membership and roles, as shown in the image.
The following information is provided, grouped by study: • Site name • Role • Since - the date and time (UTC) the membership was approved.
For users with organization roles, these are listed in the top of the page, in a separate section, providing the following information: • Organization name • Role • Since - the date and time (UTC) the membership was approved.
Note! The number of studies shown in x roles in y studies counts all the studies in which you have system roles and/or clinic roles, while the number of Studies shown on the landing page counts only the studies in which you have clinic roles. - Deleting study access
To remove yourself from a certain role within a study:
1. Click the trash icon on the right, corresponding to the role, site and study to be removed from. A confirmation dialog is displayed. 2. Click Delete to confirm deletion. A notification email will be sent to all the Study managers, or to the Site managers if any roles are delegated. - Login history
To view the login history:
1. Click Show login history in the bottom of the page. A list is displayed providing information on the last 20 login sessions. The list is ordered by date and time in descending order. A successful login is shown with a green check-mark in the Success column. An unsuccessful login is marked with a red line in the Success column. 2. Click Download in the top right corner of the displayed login history list in order to download an excel file with the complete login history. - Deleting your Viedoc account
It is possible to remove your Viedoc account, when you have no study memberships left, i.e. 0 roles in 0 studies.
To delete your Viedoc account:
1. Go to Access Settings. If you have no membership left, then you can click Remove account from Viedoc. You will be prompted to confirm the account removal by entering your password. 2. Enter your password and click Delete. A confirmation message will be displayed and a notification email will be sent to your primary email address.
Note! For identification purposes, Viedoc will keep the user ID, display name, primary email address and login history until all the studies you have participated in are deleted. All other information related to your account will be removed from the system.
9 Log out
- The log out link is located on the settings menu (see settings above). Use this link every time you leave the application.
- Important! If you exit the system without logging out, any subject you are currently working with will be locked for other users. After 5 minutes the subject will however be automatically unlocked for access by anyone.