Curriculum 'User Guide Viedoc 4'
Data entry, edits, queries Download PDF
1 The study schedule
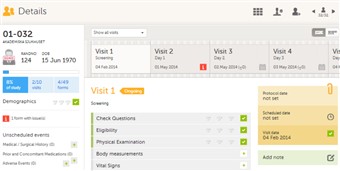
- After adding a new or selecting an existing card you will end up on the details page. This page is displaying the subjects study schedule. You can smoothly navigate between visits by moving the cursor to the left or right in the visit bar.
- Data entry forms are either located under every visit or as unscheduled events on the left side of the page.
2 Initiating a visit
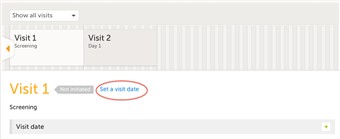
- To be able to enter data on a visit the visit needs to be initiated. Click the "set a visit date" link, choose initiate visit and select a visit date. Click save changes.
- When initiated the visit status will be changed to ongoing.
- Video tutorial: Initiating and adding new visits - Click link to play video
3 Entering data
- Open each form by clicking the form bar and complete the questions in the form. Most fields are self-explanatory when it comes to how they should be entered. Below, we have listed some fields that might need some extra explanation:
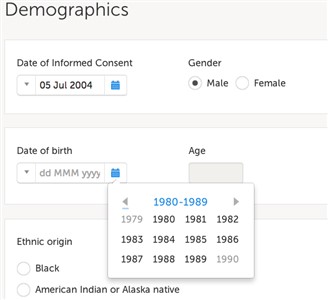
- Dates:
• Option 1: The easiest and quickest way to enter a date is through the quick menu on the left side of the date variable. Options are however limited to today, yesterday and visit date. You should also use this menu if you are not sure of the day, month or even year in the date.
• Option 2: You can also use the date picker located to the right of the date variable to select a date. Use this option when you need to select a date in the past. To select a date in the past, click the date picker icon, click the month and year header to see only years and then again to see a range of years. Choose the year, month and finally day. - Times:
• Option 1: The easiest and quickest way to enter a current time is through the quick menu on the left side of the time variable.
• Option 2: You can also use the time picker located to the right of the time variable to set a time. Either click up and down to step by a 5 minute interval or double-click the fields to set any hour and/or minute. - File upload:
• Upload a file by clicking the arrow on the right side of the upload box, or on the thumbnail if it exists. Browse for the file to be uploaded and click Open.
During the upload process: - a progress bar is showing the upload status. - you can cancel the file upload by clicking on the "X" button on the right side of the progress bar. - you can continue editing the form. - you cannot close the form until the upload process is completed. - the connection remains active as long as the upload is in progress.
• The uploaded file(s) will not be stored unless the complete form is saved by clicking Save changes.
• You can download an existing file by clicking on the file name or the thumbnail (if it exists).
• You can remove an uploaded file by clicking the delete button on the right side of the file name. If the file has been submitted previously, you will be asked to enter the reason for the change.
• Notes!
- The thumbnail is supported only for the jpeg, gif and png files. For other file types it will show only the file extension.
- The maximum allowed file size is 100 MB.
- For security reasons, it is not allowed to upload executable files. The complete list of unsupported file types can be found in the Release Notes Viedoc 4.34. - Range - define a range of values by choosing the comparator and then entering the numeric value(s).
The following comparators are available:
• “-“ – Inclusive in between • “<” – Less than • “≤” – Less than or equal to • “>” – Greater than • “≥” – Greater than or equal to • “=” – Equal - Note! When entering decimal values in numeric fields, the separator used must be ".".
- Click Save changes when all items have been entered in the form.
- Video tutorial: How to enter data - Click link to play video
4 Confirming a variable as missing
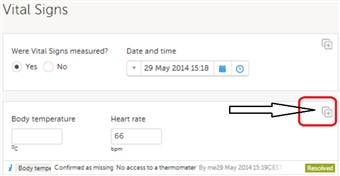
- If you are not able to provide information on a field click the action icon located in the top right corner of each group. Select the missing item in the drop down and choose the "confirm field is missing" option, provide the reason and click save.
- The item will now have a clear explanation to why it has been left empty and you can easily proceed with completing the other fields.
5 Resolving a query
- Queries are questions to data and are either raised as auto queries by the system or manually by a user having privileges for raising a query. To resolve a query, do the following:
- During data entry:
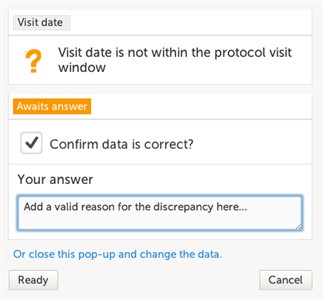
If data being entered is outside specified limits or in other ways need a clarification, a query message will appear as soon as you leave the field. Click the message for more details or correct the data directly before continuing with entering data in the rest of the form. - After form has been saved:
A form containing a query is displayed with a red issue icon. Resolve the issue(s) by clicking "edit" on the top right corner of the page and then clicking the section were the query was raised. Either confirm the value you have entered is correct or change the data directly on the screen. Don't forget to provide a reason for change if data is updated. - Video tutorial: Issues and Queries - Click link to play video
6 Editing data

- If you need to change already saved data, open the form which contains the data you want to change and then click the edit button on the top right side of the form.
When edit is clicked, the forms is open for edits. Edit the data in the field you want to change.
When changed, a "give reason" bar will appear just below the field. Select among the prefilled reasons for the change or choose other and type your own reason and click ready.
Finish off by clicking save changes on the top right side of the page. To review the change(s), please see next chapter.
Please observe! A form that has been locked by the Monitor or DM cannot be edited. If you anyway want to make an edit to a locked form, contact your local monitor.
7 Audit trail and Form history
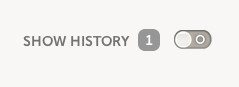
- Sometimes it is interesting to see the complete history of a form and who entered the intial information and also who made the changes (if any). To view the history click the "show history" icon located on the top right side of the page.
- A complete history of the entire form and all versions can be found by clicking the form history icon located on the bottom left side of the page.