Curriculum 'User Guide Viedoc 4'
Reference Data in Viedoc Clinic Download PDF
1 Reference data on landing page

- On the landing page, clicking the reference data button (1) will display all the reference data source - reference data scope combinations linked to the site(s) you have access to.
- For each data source - data scope combination, the following information is provided:
- Status indicator for Reference values (2) - indicating if the values were introduced (green) or if empty (grey)
- Status indicator on if the reference data set is Published (and name of the user who published it) or Not published (3)
- Notification message if the reference data set is open for edit and the name of the user who is editing it. In this case the respective reference data set is locked for edit for all the other users, only one user is allowed to edit the reference data at a time.
- The number of sites linked to the respective data source. (4)
- The number of users with edit rights on the respective reference data. (5)
- The number of forms that has data populated from the respective reference data set.
- Date and time when the reference data was last saved. (6)
- Name of the user who performed the last changes on the reference data. (6)
- Warning message if the latest saved version was not published.
- Click Open reference data editor (8) to view/edit the reference data.
2 Reference data editor
- Clicking Open reference data editor for a reference data set in the list described above, opens the respective reference data set page where, depending on the user permissions you can either view or view and edit the reference data.
- When opening a reference data set in the editor, the following information is available in a compound table:
Note! Please note that the editing actions are available only for the users that have the edit permission on reference data.
- The time period when the respective data is valid for. It is possible to have more time periods for the same source - scope combination. The newest time period is expanded by default and shown as the first time period in the list.
• Valid from (1) - the beginnig of the time period. By default this is set to current date. To change it, click on the arrow next to the right and choose an option for picking the date. • Valid to (2) - the end of the time period. By default this is set to "ongoing". To change it, click on the arrow next to the right and choose an option for picking the date. - To add a new time period, click one of the following: • Add new (3) - to create a new reference data set for a new time period from scratch. • Duplicate (4) - to create a new time period with the same referene data set as previous one that you can start from and edit.
- To remove an existing time period, click the delete button next to the right (5). A confirmation dialog will be displayed.
- Reference variable name (6) - the variables available for the respective reference data scope. See section 3. Reference variables below.
- Factors (8) - the factors that affect your reference data. See section 4. Factors below.
- The time period when the respective data is valid for. It is possible to have more time periods for the same source - scope combination. The newest time period is expanded by default and shown as the first time period in the list.
- Values to be populated - fill-in here the respective reference data values provided by the reference data source. (9)
- Cancel (10) - discard all the changes performed and revert to the latest published reference data.
- Save (11) - save the changes performed. After saving, the new reference data set is going to be available for publishing, for the user(s) having publishing rights on reference data. You need to have edit reference data permision in order to be able to perform this operation.
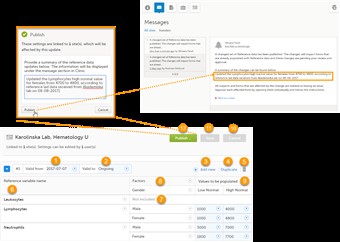
- Publish... (12) - publish the previously saved reference data to all the subject forms using the respective reference data. A dialog appears where you type in a notification message on the updates performed. This message will appear, after publishing, in the Messages section on the landing page. You need to have publish rights for reference data in order to be able to perform this operation.
- Close - clicking the Close button, without having saved the performed changes, will open a dialog asking you if you want to save your changes: • Yes - saves the changes and closes the reference data editor. • No - closes the reference data editor without saving the performed changes.
3 Reference variables
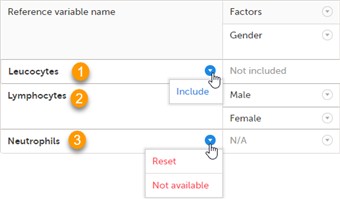
- Reference data variables is the list of the reference variables that were configured for the respective reference data scope. For each variable it is possible, by clicking the arrow next to the right to the variable name, to:
• Reset the existing variable value(s) in the Values to be populated to the default state. This action is available only for a variable that is included in the reference data list (such as (2) or (3) in the image).
• Not available - exclude the variable from the reference data. After choosing this option, Not included will be displayed next to the variable name. This action is available only for a variable that is included in the reference data list (such as (2) or (3) in the image).
• Include - add the variable back to the reference data set. This action is available for a variable that was previously excluded from the reference data (such as (1) in the image, see previous option).
4 Factors
- A factor is a parameter which may affect the normal range for a test result, such as subject’s gender or age.
- To add a new factor, click the arrow next to Factors and choose the factor to be added from the list displayed. If no options are available, it means that all the available factors are already added to the table.
- To remove an existing factor from the table, click the arrow next to the respective factor in the table and choose Remove.
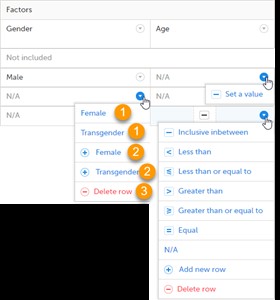
- For each of the added factors, depending on the item type, you can configure them by adding/removing options/values. By default they are populated with N/A (not applicable). This can be changed by clicking the arrow next to it and selecting an option or setting a value from the list displayed.
• Selecting one of multiple options in the list will set the current row to the chosen option (1).
• Selecting one of the options with a "+" in front of it, will add a new row populated with the chosen option (2).
• Selecting Delete row will remove the current row. (3)
Note! If you have factors that you want to set to N/A, then this should be the last entry in the list of the respective factor values. This is because, when populating the form by using reference data, when the system is trying to match the respective factor values, the matching is done from top to bottom and it stops when the first match is found. If N/A is in the list, this will always be a match, i.e. the search will stop and the form will be populated with the value that corresponds to the entry with factor = N/A.
5 Reference data in the form editor
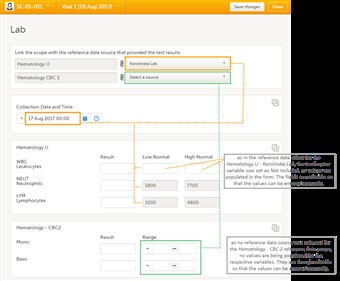
- After the reference data set was published, this becomes available in the form that was designed to use it.
- For each of the scopes used in the form, link the scope with the reference data source that provided the results by choosing it from the dropdown list.
If you do not want to use the reference data and want to fill in the whole form manually, you can do this by making no selection from the dropdown list (the active selection should be on Select a source)